However, when observing the cursor placement
in a fully surfaced point cloud image, it becomes
evident whether the point cloud has low data
quality and if cursors have been accurately posi-
tioned on the data. Reviewing both metrics in the
point cloud can help increase accuracy and preci-
sion of the collected measurement data.
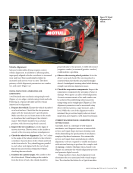
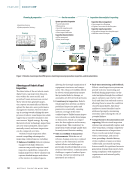
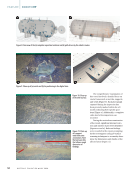
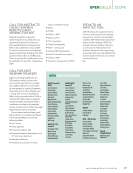
In the example in Figure 7, the technician was
not trained in how to validate the measurement
data in a stereo image, nor were they trained to
review the point cloud data and the cursor place-
ment upon the data. This led to providing a blade
tip-to-shroud clearance data of 0.031 in. (0.787 mm).
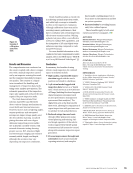
When a measurement system’s point cloud is
reviewed and pivoted in X, Y, and Z onscreen, it
immediately becomes obvious that a common
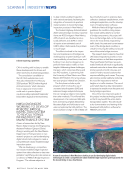
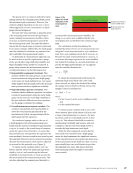
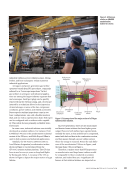
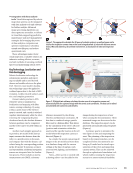
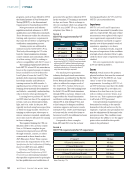
measurement error has been made. Note in
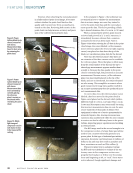
Figure 8 that when viewing the 3D data in the point
cloud image, the cursor labeled 3 of the measure-
ment’s reference plane (the lower, far-right magenta
cursor) was placed on data from the tip of the
blade, not on reference plane data for the shroud.
Note that the reference plane’s blue lines are
an extension of the three cursors used to establish
the reference plane. When that plane is tilted away
from the actual surface of the shroud, the tip-to-
shroud gap measurement appears smaller than it
actually is. Because the data quality in the point
cloud is extremely high, this presented an accurate
measurement. Because cursor 3 of the reference
plane was inaccurately placed on the tip of the
blade, and not on the shroud, the results obtained
are also wrong. This exemplifies a scenario where
good measurement image data quality resulted in
an accurate measurement but also produced incor-
rect measurement data.
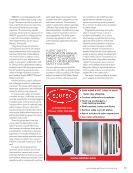
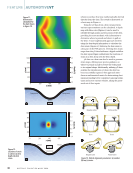
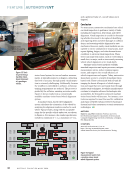
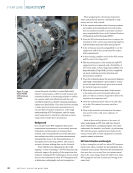
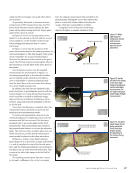
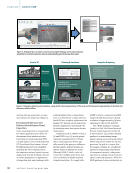
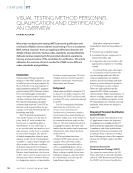
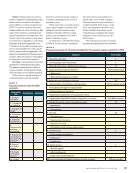
To correct this error, the reference plane cursor
labeled 3 has been moved in the point cloud in
Figure 9 and placed on the shroud, which yields a
different result of 0.062 in. (1.57 mm). This 0.031 in.
(0.787 mm) discrepancy may seem small, but using
this incorrect measurement data can cost the asset
owner hundreds of thousands of dollars if the
equipment is taken out of service prematurely for
unneeded repairs. Also, leaving erroneous mea-
surement data unaddressed while the asset remains
in service can lead to efficiency losses in the power
turbine, impacting proper operations and resulting
in revenue losses.
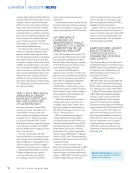
The RVI image used in the second example is in
the compressor section of a large frame gas turbine
used to turn a massive electricity generator at a
power plant. In this type of industrial gas turbine
operation, downtime can bring losses of millions of
dollars a day and may also result in penalties and
fines, sometimes as much as US$1 million [4].
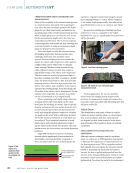
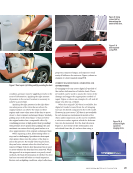
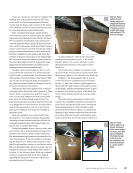
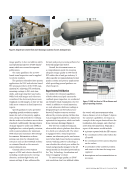
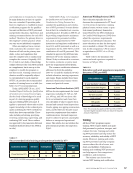
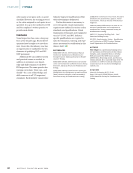
This power plant was in a planned outage.
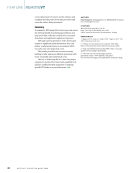
An RVI task was scheduled to evaluate if the sta-
tionary vanes in the compressor section were
properly fixed in place or if they were becoming
loose and beginning to tilt, or “rock.” Some stator
rock is allowed, though significant damage and
MTD =0.855"
Tip of blade
1
3 4
2
+0.031"
IIV+
BLK
Figure 8. Power
turbine blade tip-to-
shroud, measured
with stereo.
Measurement data
found to be in error
by reviewing the
point cloud.
IIV+
BLK MTD =0.787"
Tip of blade
1 3
4
2
+0.062"
Figure 9. Power
turbine blade tip-to-
shroud, measured
with stereo.
Measurement data
error corrected by
correctly placing
the reference
plane’s cursors on
the shroud while
reviewing the point
cloud.
Blade tip trailing edge
Near-side stator floor
Far-side stator floor
Shroud/air seal
1
2
0.066"
MTD =0.405" 044
BLK
Figure 10. White
light image of
compressor section
with stator section
to be measured for
rocking.
FEATURE
|
REMOTEVT
46
M A T E R I A L S E V A L U A T I O N • J U L Y 2 0 2 4
CREDIT:
WAYGATE
TECHNOLOGIES
CREDIT:
WAYGATE
TECHNOLOGIES
CREDIT:
WAYGATE
TECHNOLOGIES


