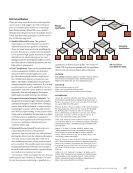
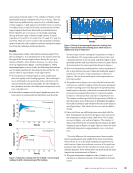
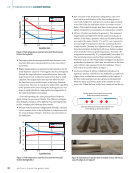
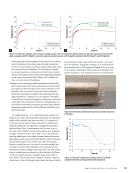
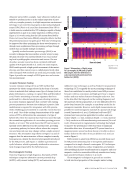
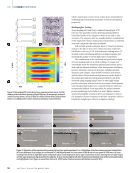
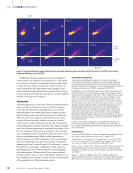
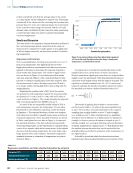
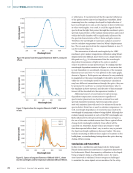
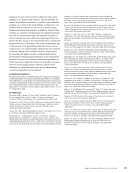
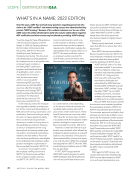
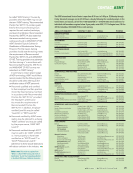
are also identified from the observed changes in the thermal readings from TC1 (that is, drop in temperature) and reaching a new plateau, respectively. Using this method, the start and end of deformation is estimated at the 10.53 and 14.97 h marks, respectively. Those are indicated with circles in Figure 11. As a crude and inherently inaccurate method, the results are in relatively good agreement. Using the ratio of the line length to estimate the fraction of the build is susceptible to error because the cross sections of the horizontal bars vary with time. This explains in part why the square markings in Figure 11 are not in exact agreement with the circles. Conclusions The nominal thermal signature of the AM process as measured from the build plate is expected to vary with the geometry of the part being built. However, the quick rise in temperature early during the process and the gradual drop thereafter, due to the increased height of the part, are expected to be the normal pattern for all part designs. Such patterns can be established experimentally or through thermal analyses. As the part being built begins to separate from the build plate, an abnormal drop in the thermal signature can be recognized. This enables the use of thermocouple sensors to be used for real-time monitor- ing and detection of separation from the build plate, and the resultant deformation of the part. The deformation is otherwise hidden under the powder and would not be realized until the conclusion of the production process. In this case, the operator or the system itself can abort the process at the 10th or 11th hour mark, rather than proceed through the entire 28 or 30 h production schedule. ACKNOWLEDGMENT This work was partially supported by The Aerospace Corp.’s Sustained Experimentation and Research for Program Applications (SERPA) program. REFERENCES Abdul Aziz, M.S., T. Furumoto, K. Kuriyama, S. Tahago, S. Abe, A. Hosokawa, and T. Ueda, , “Residual Stress and Deformation of Consol- idated Structure Obtained by Layered Manufacturing Process,” Journal of Advanced Mechanical Design, Systems, and Manufacturing, Vol. , No. , pp. –, https://doi.org/./jamdsm.. Bean, G.E., D.B Witkin, T.D. McLouth, D.N. Patel, and R.J. Zaldivar, , “Effect of Laser Focus Shift on Surface Quality and Density of Inconel Parts Produced via Selective Laser Melting,” Additive Manufacturing, Vol. , pp. –, https://doi.org/./j.addma... Beshears, R., , “Computed Tomography Inspection and Analysis for Additive Manufacturing Components,” ASNT Annual Conference, November, Nashville, TN Bilheux, H.Z., G. Song, K. An, J.-C. Bilheux, M.M. Kirka, R.R. Dehoff, L.J. Santodonato, S.B. Gorti, B. Radhakrishnan, and Q. Xie, , “Advances in Neutron Radiography: Application to Additive Manufacturing Inconel ,” Advanced Materials and Processes, www.osti.gov/servlets/purl/ Brooks, A.J., G.L. Knapp, J. Yuan, C.G. Lowery, M. Pan, B.E. Cadigan, S. Guo, D.S. Hussey, and L.G. Butler, , “Neutron Imaging of Laser Melted SS Test Objects with Spatially Resolved Small Angle Neutron Scattering,” Journal of Imaging, Vol. , No. , https://doi.org/./jimaging Cerniglia, D., M. Scafidi, A. Pantano, and J. Rudlin, , “Inspection of Additive-Manufactured Layered Components,” Ultrasonics, Vol. , pp. –, https://doi.org/./j.ultras... Edwards, R.S., B. Dutton, A.R. Clough, and M.H. Rosli, , “Scanning Laser Source and Scanning Laser Detection Techniques for Different Surface Crack Geometries,” AIP Conference Proceedings, Vol. , https:// doi.org/./. Everton, S., P. Dickens, C. Tuckand, and B. Dutton, , “Evaluation of Laser Ultrasonic Testing for Inspection of Metal Additive Manufac- turing,” Proceedings Laser D Manufacturing II, Vol. , https://doi. org/./. Griffith, M.L, M.E. Schlienger, L.D. Harwell, M.S. Oliver, M.D. Baldwin, M.T. Ensz, M. Essien, J. Brooks, C.V. Robino, J.E. Smugeresky, W.H. Hofmeister, M.J. Wert, and D.V. Nelson, , “Understanding Thermal Behavior in the LENS Process,” Materials & Design, Vol. , No. –, pp. –, https://doi.org/./S-()- Helvajian, H., A. Manzo, and S. Kenderian, , “Application of Laser Ultrasonic Nondestructive Evaluation Technique to Additive Manufac- turing,” ASNT Annual Conference, – October, Long Beach, CA Klein, M., and J. Sears, , “Laser Ultrasonic Inspection of Laser Cladded LSS and Ti--,” Proceedings of the rd International Congress on Applications of Lasers and Electro-Optics, Laser Institute of America Kube, C.M., , “Attenuation of Laser Generated Ultrasound in Steel at High Temperatures: Comparison of Theory and Experimental Measure- ments,” Ultrasonics, Vol. , pp. –, https://doi.org/./j. ultras... Manzo, A.J., S. Kenderian, and H. Helvajian, , “Application of Laser Ultrasonic Nondestructive Evaluation Technique to Additive Manufac- turing,” Proceedings of SPIE, Vol. , https://doi.org/./. Martinez-Anton, J.C., I. Serroukh, and E. Bernabeu, , “Laser Diffrac- tion Wire Diameter Measurements: Correction of Diffraction Models by Interferometric Calibration,” Proceedings, Optical Measurement Systems for Industrial Inspection, Vol. , https://doi.org/./. McLouth, T.D., G.E. Bean, D.B. Witkin, S.D. Sitzman P.M. Adams, D.N. Patel, W. Park, J.-M. Yang, and R.J. Zaldivar, , “The Effect of Laser Focus Shift on Microstructural Variation of Inconel Produced by Selec- tive Laser Melting,” Materials & Design, Vol. , pp. –, https://doi. org/./J.MATDES... Rodriguez, E., F. Medina, D. Espalin, C. Terrazas, D. Muse, C. Henry, E. Macdonald, and R.B. Wicker, , “Integration of a Thermal Imaging Feedback Control System in Electron Beam Melting,” Proceedings of rd Annual International Solid Freeform Fabrication Symposium, Austin, TX, pp. – Rodriguez, E., J. Mireles, C.A. Terrazas, D. Espalin, M.A. Perez, and R.B. Wicker, , “Approximation of Absolute Surface Temperature Measure- ments of Powder Bed Fusion Additive Manufacturing Technology Using In Situ Infrared Thermography,” Additive Manufacturing, Vol. , pp. –, https://doi.org/./j.addma... Slotwinski, J.A., and E.J. Garboczi, , “Porosity of Additive Manufac- turing Parts for Process Monitoring,” th Annual Review of Progress in Quantitative Nondestructive Evaluation, AIP Conference Proceedings, Vol. , No. , https://doi.org/./. Smith, R.J., M. Hirsch, R. Patel, W. Li, A.T. Clare, and S.D. Sharples, , “Spatially Resolved Acoustic Spectroscopy for Selective Laser Melting,” Journal of Materials Processing Technology, Vol. , pp. –, https:// doi.org/./j.jmatprotec... Thiede, T., , “An Assessment of Bulk and Surface Residual Stress in Selective Laser Melted Inconel ,” ECNDT Conference, – June, Gothenburg, Sweden Watkins, T., H. Bilheux, K. An, A. Payzant, R. Dehoff, C. Duty, W. Peter, C. Blue, and C. Brice, , “Neutron Characterization for Additive Manufac- turing,” Advanced Materials and Processes, Vol. , No. , pp. – Zhou, X., D. Wang, X. Liu, D. Zhang, S. Qu, J. Ma, G. London, Z. Shen, and W. Liu, , “D-Imaging of Selective Laser Melting Defects in a Co–Cr– Mo Alloy by Synchrotron Radiation Micro-CT,” Acta Materialia, Vol. , pp. –, https://doi.org/./j.actamat... ME | THERMOCOUPLEMONITORING 36 M A T E R I A L S E V A L U A T I O N • A P R I L 2 0 2 2
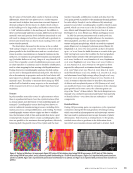
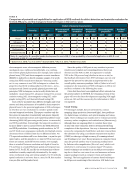
ABSTR ACT Binder jet metallic additive manufacturing (AM) is a popular alternative to powder bed fusion and directed energy deposition because of lower costs, elimination of thermal cycling, and lower energy consumption. However, like other metallic AM processes, binder jetting is prone to defects like porosity, which decreases the adoption of binder-jetted parts. Binder-jetted parts are sometimes infiltrated with a low melting temperature metal to fill pores during sintering however, the infiltration is impacted by the part geometry and infiltration environment, which can cause infill nonuniformity. Furthermore, using an infiltration metal creates a complicated multiphase microstructure substantially different than common wrought materials and alloys. To bring insight to the binder jet/infiltration process toward part qualification and improved part quality, spatially dependent ultrasonic wave speed and attenuation techniques are being applied to help characterize and map porosity in parts made by binder jet AM. In this paper, measurements are conducted on binder-jetted stainless steel and stainless steel infiltrated with bronze samples. X-ray computed tomography (XCT) is used to provide an assessment of porosity. KEYWORDS: ultrasonic testing, X-ray computed tomography, microstructure characterization, porosity Introduction Additive manufacturing (AM) is a direct-write technique in which parts are fabricated in a layered fashion following a computer-aided design. Binder jet is a category of AM in which metal green parts are fabricated at room temperature using a powder bed and an aqueous organic binder. As green binder-jetted parts are weakly bonded through the binder, parts are then sintered to remove the binder and fuse the metal powder. To help improve the density of the part, an infil- tration step is sometimes performed in which a lower melting point metal is wicked into the sintered part (Do et al. 2018). Post-processing heat treatments increase component density however, it remains challenging to remove all porosity in binder-jetted metal alloys (Zhu et al. 2020). As pores are stress concentrators with higher probabilities to initiate fracture and impact mechanical properties, it is important to detect such defects post process (Kurgan 2014). Nondestructive evaluation (NDE) techniques can aid in defect detection as well as char- acterization of process-structure linkages in novel AM pro- cesses. In particular, there is a significant need to develop NDE techniques to characterize final binder-jetted parts (Hassen and Kirka 2018) and identify processing conditions that yield reliable components. X-ray computed tomography (XCT), an NDE technique commonly used to detect discontinuities, has been success- fully applied to detect and characterize pores in AM materials (Thompson et al. 2016). Wilson-Heid et al. (2019) evaluated intentional internal penny-shaped pores with XCT and studied their effects on the tensile properties of laser powder bed fusion fabricated stainless steel 316L (SS316L). Ilogebe et al. (2019) observed the internal pore structure and determined the pore volume fraction of binder-jetted structural amor- phous metals with XCT. Zhu et al. (2020) combined XCT with machine learning to characterize pore evolution of binder- jetted copper after fabrication without any further processing, after sintering, and after hot isostatic pressing. Pores were char- acterized by size, sphericity, and orientation, and the authors noted that pores in sintered samples tend to be smaller, more spherical, and are orientated horizontally due to anisotropic sintering (Zhou et al. 2020). While XCT can be used to char- acterize porosity, the accuracy of the data highly depends on the scanning resolution (the voxel size) pores smaller than the voxel size will not be detected and the minimum detect- able pore size is at least three voxels wide in two dimensions (2D) and at least 27 voxels in volume in three dimensions (3D) ULTRASONIC CHARACTERIZATION OF POROSITY IN COMPONENTS MADE BY BINDER JET ADDITIVE MANUFACTURING BY OLIVIA J. COOK*, NANCY HUANG†, ROBERT L.W. SMITHSON‡, CHRISTOPHER M. KUBE*, ALLISON M. BEESE†§, AND ANDREA P. ARGÜELLES** * Department of Engineering Science and Mechanics, Pennsylvania State University, University Park, PA 16802, USA † Department of Materials Science and Engineering, Pennsylvania State University, University Park, PA 16802,USA ‡ 3M Co., Maplewood, MN 55144, USA § Department of Mechanical Engineering, Pennsylvania State University, University Park, PA 16802, USA ** Department of Engineering Science and Mechanics, Pennsylvania State University, University Park, PA 16802, USA arguelles@psu.edu Materials Evaluation 80 (4): 37–44 https://doi.org/10.32548/2022.me-04266 ©2022 American Society for Nondestructive Testing NDTTECHPAPER | ME A P R I L 2 0 2 2 • M A T E R I A L S E V A L U A T I O N 37
ASNT grants non-exclusive, non-transferable license of this material to  .
All rights reserved. © ASNT 2026. To report unauthorized use, contact: customersupport@asnt.org


