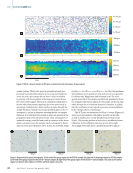
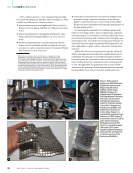
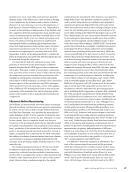
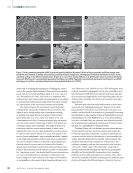
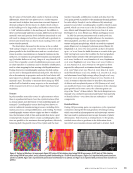
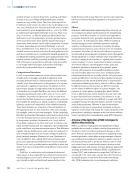
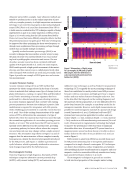
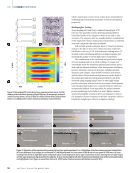
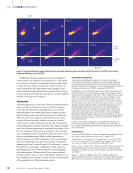
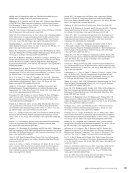
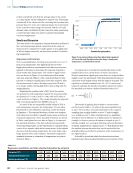
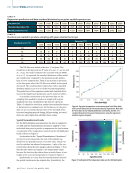
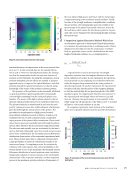
residual stresses can lead to distortions, cracking, and failure (Cottam et al. 2014). Within AM deposited parts, residual stresses can vary within a layer. They have been reported to be different at the bottom of a layer to the top (Denlinger et al. 2014, 2015 Michaleris 2014 Mercelis and Kruth 2006), and have been reported to reach magnitudes such as ~400 to 800 MPa in nickel-based superalloys (Denlinger et al. 2014 Vilaro et al. 2012) or as low as ~25 MPa for aluminum alloys (Brice and Hofmeister 2013). Not surprisingly, given the gradient nature of the local stress/strain states and the typical balancing of stress states, these stresses can be either compressive or tensile in nature, depending upon location (Denlinger et al. 2015 Brice and Hofmeister 2013). Roberts et al. (2009) reported that residual stresses are directly related to thermal gradients in the melt pool, and thus can be controlled by thermal gradients by modifying the printing parameters and scanning strategy. Such residual stresses would be potentially suitable for nonlinear NDE techniques post deposition, although it may be possible to use image-based techniques and machine learning to predict the local residual stress of a component. Compositional Variations In AM, compositional variations can be induced either inten- tionally (such as through controlled modification of the incoming material feed) or unintentionally (such as through volatility of an elemental species in the presence of a vacuum and exposed to significant superheats). In addition to these macroscopic changes in composition of the local melt pool or its surface, the complex fluid flow can convey the different compositional domains (often at flow rates of 0.1 to 1.0 m/s). In addition, for powder bed processes, it has recently been shown that the fluid dynamics are coupled with the convective forces within the molten pool, which can have a considerable influence on the local composition of the solidified material. These fluid dynamics are a function of thermal gradients in the liquid pools and are thus a function of the scan strategies (for example, raster or spot scan strategies). Of the competing fluid-flow mechanisms, Marangoni convection has been shown to be the dominant factor in raster melt pools, as it is driven by temperature gradients. Hojjatzadeh et al. (2019) defined three distinct regions in the raster melt pool: circulation, tran- sition, and laser interaction. In comparison, spot melting melt pools would have only laser interaction regions. This difference explains why gas bubbles more easily escape the melt pool in spot melting strategies and can remain entrapped (and form pores) in raster strategies (Kenney et al. 2021 Quintana et al. 2021). In addition, this coupled effect between defects (gas pores) and compositional fields has been recently confirmed (Kenney et al. 2021), providing another possibility to relate two defects that may be interpretable using different measurement modalities. Fluid flow, in combination with preferential elemental vaporization, is also responsible for a phenomenon known as banding (Figure 3c) and can be observed in optical micros- copy (usually as light and dark bands perpendicular to the build direction) and energy dispersive spectroscopy (capturing bands and chemical turbulent signatures in the presence of defects). Phases Structural, multicomponent engineering alloys often rely on second phases (or phase transformations) for strengthening purposes. Such alloys include γ-γ′ nickel-based superalloys, precipitate hardened steels, precipitate hardened aluminum alloys, and α + β and β titanium alloys. While in traditional manufacturing processes, materials experience a specific sequence of temperature excursions to optimize the phase transformations sequence and evolution of the second phase precipitates, the nature of AM forces the alloys to experience an externally governed number of thermal cycles (through the slicing algorithm) of a rather extensive range of possible tem- peratures, ranging from remelting to “optimal phase transfor- mation windows” to lower temperature heating/coarsening, all of which influence crystallographic texture, grain size, formation–dissolution–formation of precipitates, phase fraction, and formation of nonequilibrium phases, includ- ing noncrystalline phases in some cases. Traditional phase transformation models are not fully valid for AM systems and require modification to incorporate these thermal cycles and their influence in the already printed layers. Compositional variations and banding can also be related to different phases in different locations within a layer, as different chemistry can be related to different regions in a phase diagram. The presence of certain phases, morphologies, phase distribu- tions, or phase fractions can be achieved in some cases only by post-deposition heat treatments. This domain is, on the one hand, perceived as the most difficult to couple with NDE modalities because it is the least mature, and due to the size/ scale of the precipitates. However, it may be that indirect methods can be used to assess phase formation, as the pre- cipitation of one phase will change the crystal chemistry of the parent phase, resulting in changes in the local elastic stiffness tensor, a property that is determinable using NDE techniques. A Review of the Application of NDE Techniques for Additive Manufacturing NDE is a collection of qualitative and quantitative testing methods that are used to evaluate certain characteristics of the subject under test without permanent damage or alter- ation. NDE can provide critical information regarding certain material properties, which plays an important part of provid- ing confidence for qualification and better quality control of the material being used or produced. NDE can also be used on a routine basis to continuously monitor mission-critical (high-value) parts and systems over their lifespans. Rigorously speaking, nondestructive evaluation (NDE), nondestructive testing (NDT), and nondestructive inspection (NDI) do not correspond to the exact same concept, but it has become an acceptable practice to use these three terms interchange- ably. NDE techniques rely on electromagnetic radiation, ME | AMNDEOVERVIEW 52 M A T E R I A L S E V A L U A T I O N • A P R I L 2 0 2 2
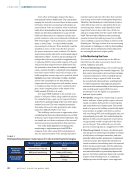
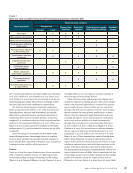
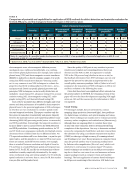
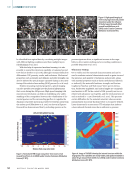
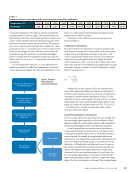
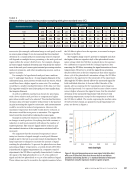
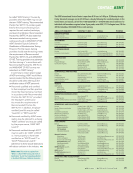
electromagnetic wave, electromagnetic diffusion process, mechanical wave, visible and invisible light, or a combina- tion of those physical phenomena (for example, laser induced phased array [LIPA] and electromagnetic acoustic transducer [EMAT]) to indirectly or directly examine samples. It is worth noting that NDE is much more than just “detecting cracks,” as it is very common to use NDE techniques to evaluate the properties of perfectly working subjects at the micro-, meso-, and macroscale. Based on specific physical processes and principles, NDE techniques can be broadly divided into six modalities: visual testing (VT), ultrasonic testing (UT), acoustic emission testing (AE), electromagnetic testing (ET), radio- graphic testing (RT), and thermal/infrared testing (IR). Each of these modalities has different strengths and weak- nesses, and their performance is bounded by their respective physical basis. In the potential application of NDE techniques in AM, there are two resolutions to consider: spatial resolu- tion and temporal resolution. This paper considers only the first, given its immediate translatability and greater disparity between the materials science and engineering/additive man- ufacturing (MSE/AM) processing needs (micro- to mesoscale) and NDE possibilities. Interestingly, the temporal resolution is far more likely to have a match between the MSE/AM needs and NDE possibilities. Considering spatial resolution, for VT and UT (both wave propagation methods), the Rayleigh criteria determines their resolution limit due to diffraction limits. For VT, expected resolution will be no better than ~0.2 μm for opti- mized optics, and this number is 0.2 mm for UT in most cases. There are intrinsic tradeoffs between metrics. For example, there is a tradeoff between resolution and depth of focus for VT, and there is a tradeoff between spatial and temporal reso- lution for UT. For ET, RT, and IR, the resolution limit of these modalities is mainly empirically determined by the equip- ment, mechanical setup, and testing samples. For ET methods, spatial resolution is no better than 0.2 mm for IR, this number is 20 μm (Ida and Meyendorf 2019). Since the quality of AM parts is very sensitive to process windows and complex and competing physics, there is an obvious need for NDE on AM. It is imperative to include NDE in the AM process loop (whether in situ or ex situ) so that feedback information from NDE techniques can not only improve the process but also play an important role in the overall quality assurance paradigm. Table 2 (Taheri et al. 2017) summarizes the matureness of NDE techniques on AM in 2017 and their evolution in the following four years. Given that there have been significant efforts extended on the general subject of AM NDE, the remaining section of this paper will cover the latest developments regarding NDE appli- cation on AM, and the reasons why the information in Table 2 was updated. Visual Testing VT techniques include, but are not limited to, contour mapping, fringe projection (structured light), laser profilome- try, digital image correlation, and optical imaging and tomog- raphy. These techniques are mainly used to evaluate geometric accuracy, surface roughness, and residual stress (Sharratt 2015), although there are ongoing efforts to correlate these types of data with other volumetric defects determined following completion of the depositions. One way to determine residual stresses by comparing the build before and after removal from the substrate is by using a coordinate measurement machine (CMM) or other type of high-accuracy 3D scanning technol- ogy (Denlinger et al. 2014). Recent progress in computer vision may also provide another way of measuring residual stress by Eulerian video magnification (Wu et al. 2012), which is rel- atively low in cost because it is camera based. VT (camera based) techniques are useful for in situ AM process monitor- ing due to their low cost, ease of use, and numerous software support packages (such as computer vision and machine learning). The basic application of camera-based techniques in AM process monitoring is flaw detection. LOF defects can T A B L E 2 Comparison of potential and capabilities for application of NDE methods for defect detection and materials evaluation for finished AM parts, and the changes to these techniques in the last four years NDE method Defect of material characteristics Porosity Crack Microstructural anomalies Geometrical anomalies Mechanical properties Electromagnetic properties Residual stress 2017 2021 2017 2021 2017 2021 2017 2021 2017 2021 2017 2021 2017 2021 Visual C B1 C B1 A A N B2 N N B3,4 Ultrasonic A A A B A N B Electromagnetic B A D B N A C Radiography A A C A N N A Thermal/infrared D B5 B D B N N N Note: A = applicable B = possible/needs development for use in AM C = low probability of successful application to AM D = not applicable to AM N = not applicable 1 Gobert et al. 2018 2 Lu et al. 2019 3 Sharratt 2015 4 Wu et al. 2012 5 McNeil et al. 2020 A P R I L 2 0 2 2 • M A T E R I A L S E V A L U A T I O N 53
ASNT grants non-exclusive, non-transferable license of this material to  .
All rights reserved. © ASNT 2026. To report unauthorized use, contact: customersupport@asnt.org


