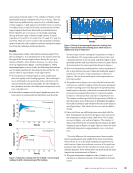
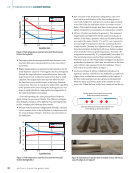
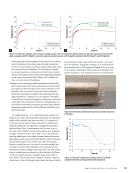
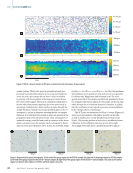
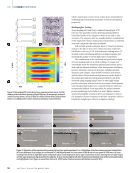
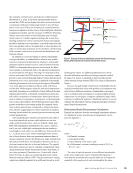
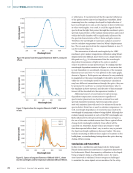
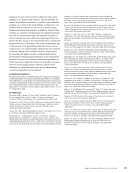
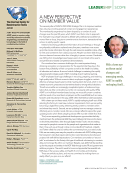
or reflectance. It was determined that the spectral reflectance of the galvanometer mirrors had significant variability, likely stemming from the coatings developed for high reflection of laser wavelength (1070 nm), at the expense of altered reflection at other wavelengths. As a result, it could be argued that the spectra from the light that passes through the machine’s optics, spectral characteristics of the radiant emission from any source within the build chamber will be significantly influenced by the spectral characteristics of the F-theta and galvo mirrors. Therefore, the wavelength of maximum radiance cannot be used to calculate temperature based on Wien’s displacement law. The on-axis spectra from the tungsten filament at 1600 °C can be found in Figure 10. The attenuation of infrared wavelengths by the LPBF machine’s optics makes temperature calibration using Wien’s displacement law difficult, since there is not a single discern- ible peak nor λmax. It is demonstrated that the wavelength- dependent transmission of light in the optics is another source of noise for on-axis spectroscopy. To confirm that the wavelength-dependent variation in Figure 10 is not noise but is truly dependent on wavelength, the spectra of the tungsten filament at 1500 and 1600 °C were plotted on the same graph, shown in Figure 12. Both spectra are observed to vary similarly in magnitude at the same wavelength. It should be noted that while the two wavelengths used for temperature calculation may have different transmittances through the optics, they can be presumed to each have a constant transmittance (due to the similarity in these spectra), and the ratio of their transmit- tances will be absorbed into the regression variable A. Additional sources of uncertainty for spectroscopy- dependent temperature measurements regardless of spectrometer placement are electron emission lines and spectral emissivity variations. Spectroscopy peaks associ- ated with emission lines will need to be subtracted from the spectra before Wein’s law is used to calculate temperature. As well, wavelength dependance of emissivity may result in the wavelength of maximum radiance being shifted. Although the radiated energy measured at each of the TEP wavelengths are likely influenced by the spectral features shown in Figure 11, the use of the ratio method means that if these optical effects change both wavelengths similarly, these effects will be canceled out. Therefore, future work is necessary to verify that these spectral effects don’t vary in such a way to perturb the dual-wavelength calibration discussed earlier. This may include measuring at different laser angles or locations on the build plane, or standardizing/testing when the optics heat up during AM processing. Conclusions and Future Work In this work, a justification and framework for bichromatic Planck thermometry are introduced. A regression framework for bichromatic Planck thermometry calibration is developed. Using a tungsten lamp as a blackbody source, the regres- sion framework is validated. Sensor setups are challenged to maintain the same signals across machines. In the setup 12 000 10 000 8000 6000 4000 2000 0 Wavelength (nm) 200 400 600 800 1000 Figure 10. Spectra from the tungsten filament at 1600 °C, measured off axis. ME | MELTPOOLMONITORING 12 000 10 000 8000 6000 4000 2000 0 Wavelength (nm) 200 400 600 800 1000 Figure 11. Spectra from the tungsten filament at 1600 °C, measured on axis. 12 000 10 000 8000 6000 4000 2000 0 Wavelength (nm) 200 400 600 800 1000 1500 ºC 1600 ºC Figure 12. Spectra of tungsten filament at 1500 and 1600 °C, shown near the wavelengths used for temperature calibration (680 and 700 nm). 72 M A T E R I A L S E V A L U A T I O N • A P R I L 2 0 2 2 Intensity (counts) Intensity (counts) Intensity (counts)
proposed, the gain values used for calibration may vary by machine to account for any variation. This should allow for sensors from different machines to yield the same calibrated readings. As a result of this methodology, a temperature cal- ibration with an accuracy of 1.3 to 6.1 is realized using bichromatic Planck thermometry. In addition, trends in data variation as a function of temperature are analyzed, showing that with a constant sensor gain, the standard deviation of sensor readings decreases with increasing temperature. It is shown that this change in the standard deviation of predicted temperatures is not solely due to the source temperature, but to the amount of the signal being reduced at lower source temperatures. It is experimentally validated that low standard deviation readings can be achieved at lower temperatures by increasing the signal. As well, a software framework is developed for reducing spatial deviations in the temperature measured. Future work includes conducting experiments to better characterize spatial deviations of temperature measure- ment and developing hardware solutions, which would eliminate any spatial deviations that are not characteristic of position-dependent process physics. ACKNOWLEDGMENTS The authors would like to thank Brandon Lane (brandon.lane@nist.gov) at National Institute of Standards and Technology (NIST) for consultancy and collaboration, to help produce the methodology and procedures and consultancy regarding the results and analysis. As well, the authors would like to thank Martin Piltch of the Los Alamos National Laboratory and Sigma Labs for consultancy on laser physics and nonlinear optics, as well as writing and revising. REFERENCES Bronstein, M.M., J. Bruna, T. Cohen, and P. Velic ˇkovic′, , “Geometric Deep Learning: Grids, Groups, Graphs, Geodesics, and Gauges,” ArXiv:. [Cs, Stat], https://doi.org/./arXiv.. Chauveau, D., , “Review of NDT and Process Monitoring Techniques Usable to Produce High-Quality Parts by Welding or Additive Manufac- turing,” Welding in the World, Vol. , pp. –, https://doi .org/./s--- Coates, P.B., , “Multi-Wavelength Pyrometry,” Metrologia, Vol. , No. , p. , https://doi.org/./-/// Deisenroth, D.C., S. Mekhontsev, B. Lane, L. Hanssen, I. Zhirnov, V. Khromchenko, S. Grantham, D. Cardenas-Garcia, and A. Donmez, , “Measurement Uncertainty of Surface Temperature Distributions for Laser Powder Bed Fusion Processes,” Journal of Research of the National Institute of Standards and Technology, Vol. , https://doi.org/./jres.. Dunbar, A.J., and A.R. Nassar, , “Assessment of Optical Emission Analysis for In-Process Monitoring of Powder Bed Fusion Additive Manu- facturing,” Virtual and Physical Prototyping, Vol. , No. , pp. –, https://doi.org/./.. Everton, S.K., M. Hirsch, P. Stravroulakis, R.K. Leach, and A.T. Clare, , “Review of In Situ Process Monitoring and In situ Metrology for Metal Additive Manufacturing,” Materials & Design, Vol. , pp. –, https: //doi.org/./j.matdes... Gibson, C.E., B.K. Tsai, and A.C. Parr, , “Radiance Temperature Calibrations,” NIST Special Publication -, National Institute of Stan- dards and Technology, Gaithersburg, MD, https://doi.org/./NIST. SP.- Grasso, M., and B.M. Colosimo, , “Process Defects and In Situ Moni- toring Methods in Metal Powder Bed Fusion: A Review,” Measurement Science and Technology, Vol. , https://doi.org/./-/aacf Hooper, P.A., , “Melt Pool Temperature and Cooling Rates in Laser Powder Bed Fusion,” Additive Manufacturing, Vol. , pp. –, https: //doi.org/./j.addma... Khairallah, S.A., A.T. Anderson, A. Rubenchik, and W.E. King, , “Laser Powder-Bed Fusion Additive Manufacturing: Physics of Complex Melt Flow and Formation Mechanisms of Pores, Spatter, and Denudation Zones,” Acta Materialia, Vol. , pp. –, https://doi.org/./j .actamat... Lane, B., L. Jacquemetton, M. Piltch, and D. Beckett, , “Thermal Calibration of Commercial Melt Pool Monitoring Sensors on a Laser Powder Bed Fusion System,” NIST Advanced Manufacturing Series -, National Institute of Standards and Technology, Gaithersburg, MD, https://doi.org/./NIST.AMS.- McCann, R., M.A. Obeidi, C. Hughes, É. McCarthy, D.S. Egan, R.K. Vija- yaraghavan, A.M. Joshi, V.A. Garzon, D.P. Dowling, P.J. McNally, and D. Brabazon, , “In Situ Sensing, Process Monitoring and Machine Control in Laser Powder Bed Fusion: A Review,” Additive Manufacturing, Vol. , https://doi.org/./j.addma.. Meng, L., B. McWilliams, W. Jarosinski, H.-Y. Park, Y.-G. Jung, J. Lee, and J. Zhang, , “Machine Learning in Additive Manufacturing: A Review,” JOM, Vol. , pp. –, https://doi.org/./s---y Saunders, P., , Radiation Thermometry: Fundamentals and Applica- tions in the Petrochemical Industry, SPIE Press Snow, Z., A.R. Nassar, and E.W. Reutzel, , “Review of the Formation and Impact of Flaws in Powder Bed Fusion Additive Manufacturing,” Additive Manufacturing, Vol. , https://doi.org/./j.addma .. Snow, Z., B. Diehl, E.W. Reutzel, and A. Nassar, , “Toward In Situ Flaw Detection in Laser Powder Bed Fusion Additive Manufacturing through Layerwise Imagery and Machine Learning,” Journal of Manufacturing Systems, Vol. , pp. –, https://doi.org/./j.jmsy... Spears, T.G., and S.A. Gold, , “In-Process Sensing in Selective Laser Melting (SLM) Additive Manufacturing,” Integrating Materials and Manufacturing Innovation, Vol. , pp. –, https://doi.org/. /s--- A P R I L 2 0 2 2 • M A T E R I A L S E V A L U A T I O N 73
ASNT grants non-exclusive, non-transferable license of this material to  .
All rights reserved. © ASNT 2026. To report unauthorized use, contact: customersupport@asnt.org


