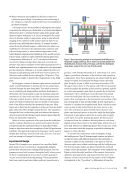
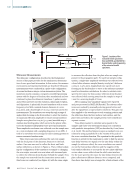
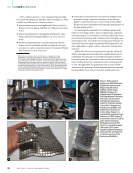
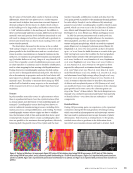
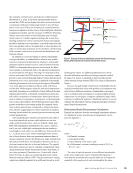
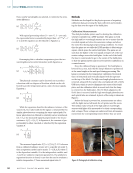
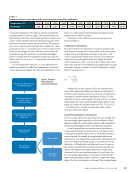
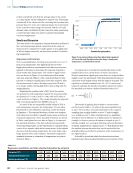
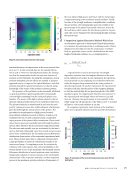
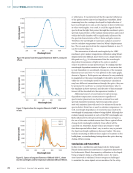
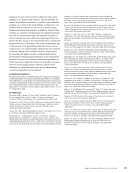
Many references are published in the form of reports or conference proceedings. Concerning in situ monitoring of the AM part, a relatively small number have been published in refereed journals. A few papers have been published utilizing thermocouples to monitor the AM process. Abdul Aziz et al. (2013) investigated deformation due to residual stresses using strain gauges and thermocouples. Rodriguez et al. (2015) investigated the acqui- sition of absolute surface temperatures using in situ infrared imaging of the melted or solid surfaces layer by layer for an electron-beam AM fabrication system. To acquire absolute values from the infrared images, a calibration procedure was established to determine the solid material’s emissivity and reflected temperature or mean radiant temperature of the build chamber. Experimental validation of the model was per- formed using a thermocouple embedded during fabrication. A temperature difference of ~36 °C was observed between uncorrected infrared temperature data and corrected tem- perature data. Upon validation of the infrared parameters for a melted area, experimentation was conducted to also determine powder emissivity. Delinger et al. (2015) studied the effects of changes in path planning and dwell time between passes on distortion and residual stresses during the AM process. They used thermocouples to monitor the temperatures at the build plate. In this paper, a series of thermocouple sensors are placed under a metal build plate to monitor the in situ temperature received through the part being built. The initial motivation was to evaluate peak temperatures and their dwell times to determine if the environment is safe for attaching ultrasonic transducers at a later time and collect in situ measurements. It became evident, however, that the thermocouple measure- ments revealed several factors that are specific to the param- eters of the AM process and the geometry of the part. Most important is detecting the separation of the part from the build plate under the effect of high residual stresses. The separation disrupts the heat conductivity path and reduces the amount of heat received by the thermocouple element placed directly below the separated component. When it occurs, separation of the part from the build plate and the resultant distortion are undetected because the part is buried under the unused powder. It is typically revealed hours or days later upon the completion of the AM production schedule. The approach proposed in this paper can be used to identify this anomaly, abort the task early, and serve as a time- and cost-saving tool integral to the process. Experimental Design Inconel IN718 samples were prepared on a modified build plate made of 4130 tool steel in a commercially available powder bed selective laser melting (SLM) machine. Process parameters were held constant during the build: a laser power of 180 W scanning speed of 600 mm/s a hatch spacing of 105 μm and an island scanning strategy. These parameters have been used in previous studies and have been shown to produce 99 density (McLouth et al. 2018 Bean et al. 2018). Figure 1 provides a schematic of the machine and operating components. Once these parameters are entered and the part design is loaded, the build process begins when the build plate drops by 30 μm to allow a new layer of powder to fill the gap it leaves above it. The piston under the metal powder reservoir pushes the powder in the reservoir upward, and the re-coater arm spreads a new layer of powder above the bare build plate. Once a fresh layer of powder has been spread across the build plate, the laser melts the current layer in a pattern that corresponds to the horizontal cross section of the parts being built at that specific height. In this experiment, a number of cylinders are manufactured. Each cylinder’s entire cross section is fully melted before the laser moves to the next. The melt process pauses briefly when the laser com- pletes one layer and moves to the side, while the build plate is lowered 30 μm again to allow the re-coater arm to apply a new layer of powder. During this pause, the heat source is removed from the cylinders, allowing them to cool down slightly as heat flows down to the build plate, which acts as a heat sink. There is an additional pause that occurs once every hour associated with the stoppage required for shaking the hopper to clean the filter. To monitor the temperature of the build plate during the build process, Type-K thermocouple sensors are placed at eight locations and different depths in the build plate. A channel is milled on the underside of the plate to feed the thermocouple wires without interfering with the build process. The thermocouple readers are placed outside the enclosed volume of the AM machine. The schematic of the build plate in Figure 2 shows the eight positions of the sensors, the grooves milled for their placement, and channel for their wires. The distance of each sensor from the top surface of the build plate is designated as the “Z position” to differentiate it from the Laser Re-coater arm Metal powder inside hopper Build plate Powder overflow Thermocouple wires Thermocouple reader Build plate piston motor Hopper piston motor Figure 1. Basic operating principle of metal powder bed AM process: the powder supply pushes up, the re-coater arm spreads powder over the build plate, the laser melts a thin layer, and then the build plate drops down, ready for the next coat of fresh powder. A P R I L 2 0 2 2 • M A T E R I A L S E V A L U A T I O N 31

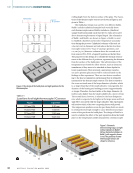
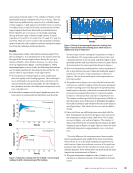
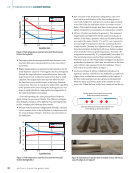
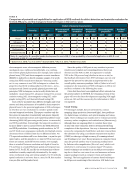
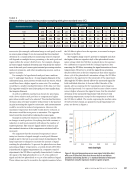
milling depth from the bottom surface of the plate. The Z posi- tions of the thermocouple sensors are shown in Figure 2 and given in Table 1. This build plate design was used for two different builds. Build 1 includes cylindrical samples built vertically above each thermocouple sensor. Build 2 includes a cylindrical sample built horizontally, such that the two ends are located above thermocouple sensors of equal depth. The schematics of Build 1 and Build 2 are shown in Figure 3. Build 1 is used to establish a baseline and monitor temperature accumula- tion during the process. Cylindrical columns of Inconel 718 2.54 cm (1 in.) in diameter are built above the first four ther- mocouple sensors (TC1–TC4), of varying Z positions, and 1.27 cm (0.5 in.) diameter columns above the second set of four sensors (TC5–TC8), of equal Z position as the first four. The purpose for this design is to identify the thermal environ- ment at the different four Z positions, representing the distance from the surface of the build plate. This will determine if the temperatures are hostile for other sensors, such as ultrasonic transducers, if they were to be attached at these depths for future experiments. More precisely, appropriate transduc- ers and Z position placements will be selected based on the findings in this experiment. There are two factors contribut- ing to the heat accumulation environment that is ultimately measured by the thermocouple sensors. The first is related to the cross-sectional area of the large-diameter cylinders, which is 4× larger than that of the small cylinders. Consequently, the duration of the heating and melting process is approximately 4× longer. Therefore, the heat intake at the large-diameter cyl- inders is also higher than the small cylinders by a factor of four. The second factor, however, is related to the heat dissipation rate, which is expected to be higher in the larger mass and heat sink effect associated with the large cylinders. This experiment will resolve which of the two competing factors will prevail. The temperature gradient across the part being built can result in residual stresses high enough to cause distortions and sepa- ration of the part from the build plate. The design of Build 2 is used to evaluate the effect of the part separation from the build plate on the temperature profile measured by a thermocouple ME | THERMOCOUPLEMONITORING TC1 TC1 TC5 TC6 TC7 TC8 TC5 TC6 TC7 TC8 Figure 3. Schematic demonstrating layup: (a) eight vertical cylinders in Build 1 (b) four horizontal cylinders in Build 2, with supports shown in red. The positions of some thermocouple sensors are shown for reference. Wiring channel TC1 TC2 TC3 TC4 TC5 TC6 TC7 TC8 Z position Build surface Figure 2. The design of the build plate and eight positions for the thermocouples. T A B L E 1 Z positions for all eight thermocouple (TC) sensors TC pair Z position TC1 and TC5 3.81 mm TC2 and TC6 7.62 mm TC3 and TC7 11.43 mm TC4 and TC8 15.24 mm 32 M A T E R I A L S E V A L U A T I O N • A P R I L 2 0 2 2 Z = 0.38 cm Z = 0.76 cm Z = 1.14 cm Z = 1.52 cm
ASNT grants non-exclusive, non-transferable license of this material to  .
All rights reserved. © ASNT 2026. To report unauthorized use, contact: customersupport@asnt.org