SCANNER
|
RNDEABSTRACTS
UTILIZING AN ULTRASONIC
INSPECTION SYSTEM
OPERATING INSIDE AN
AUTOCLAVE AND MACHINE
LEARNING TO QUANTIFY
POROSITY WITHIN
COMPOSITES DURING CURE
Tyler B. Hudson, Gavin R. Chung, Joseph J.
Pinakidis, Patrick J. Follis, Thammaia
Sreekantamurthy, and Frank L. Palmieri
Composite materials are increasingly being utilized
in aerospace applications for their high stiffness,
strength-to-weight ratios, and fatigue resistance.
However, defects in the composite may arise during
cure (e.g., porosity, delamination, fiber waviness),
and current technology only allows for post-cure
evaluation (e.g., microscopy, ultrasonic inspection).
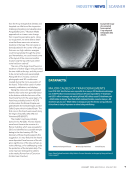
A high-temperature ultrasonic scanning system was
developed for deployment in an autoclave, which
can detect porosity in composites during the cure
process. This study focused on the implementation
of machine learning techniques to help generate
a model that can quantify porosity, in addition to
detection and localization that has previously been
demonstrated. Two 6 h long experiments were
conducted on curing of 762 × 305 mm (30 × 12 in.)
composite panels with a [0/45/90/–45]4s layup
and varying regions of high and low pressure due
to its tapered geometry in contact with a flat caul
plate. The first experiment utilized a thick (12.7 mm)
caul plate and the second utilized a thin (3.2 mm)
caul plate. During experimentation, within the
scan area (406 × 13 mm), data was recorded and
stored for ultrasonic amplitude. Additional variables
were measured or predicted including tempera-
ture, autoclave pressure, number of plies, slope of
the composite panel surface with respect to the
transducer, viscosity, and glass transition tempera-
ture. The preprocessed data was entered into the
Regression Learner Application in MATLAB® and a
rational quadratic Gaussian process regression was
chosen for the machine learning algorithm. The
model was then trained on a larger dataset to make
it more robust and capable of predictions using a
function callout. The result was a machine learning
algorithm that can reliably quantify porosity in a
composite panel during cure based on measured
amplitude response and generate images for
intuitive visualization. This tool can be further
trained with more experimentation and potentially
employed for real-time porosity detection and quan-
tification of composite components during cure in
an autoclave. Practical use of this technology is the
potential to dynamically control processing parame-
ters (e.g., autoclave pressure) in real time to reduce
the level of porosity within the laminate to accept-
able limits (e.g., 2% by volume).
KEYWORDS: defect detection inspection during
cure machine learning (ML) porosity process
monitoring ultrasonic testing (UT)
https://doi.org/10.1080/09349847.2023.2277424
COMPARISON OF
IN-SITU NONDESTRUCTIVE
TESTING AND EX-SITU
METHODS IN ADDITIVE
MANUFACTURED
SPECIMENS FOR INTERNAL
FEATURE DETECTION
Youssef AbouelNour and Nikhil Gupta
The effectiveness and repeatability of additive
manufacturing (AM) technologies has been often
measured through rigorous testing, both in situ
and ex situ. In situ nondestructive testing (NDT) has
been used to understand the AM process and detect
anomalies during the build. Ex situ testing has
been used for material characterization and internal
defect detection. In this work, in situ NDT and ex situ
testing methods are compared as applied to a fused
filament fabrication (FFF) process to detect defects
that have formed internally in the part. Intentionally
embedded features and defects are monitored
and analyzed in situ and ex situ. Results from an
automated image-based real-time defect detection
system, an ultrasound ex situ system, and a tensile
testing system are compared to detect defects and
their effects on mechanical properties. Real-time
image-based defect detection is found to effectively
spot defects as they form and allow the potential for
implementing defect correction methods, while ex
situ tensile testing can be used as a form of valida-
tion to in situ results.
KEYWORDS: additive manufacturing in situ
monitoring defect detection optical imaging
thermal imaging ultrasound
https://doi.org/10.1080/09349847.2023.2280650
EVALUATION OF DEFECT
DEPTH OF X70 PIPELINE
STEEL BASED ON THE
PIEZOMAGNETIC SIGNALS
Sheng Bao and Pengfei Jin
In this research, the correlation between the defect
depth and the tangential piezomagnetic field of X70
steel was investigated. Tensile tests were carried out
to measure the piezomagnetic fields on the surface
of X70 specimens with different defect depths. The
variations of piezomagnetic fields were compared
to the simulation results of a theoretical model. The
influences of loads and defect depths on magnetic
parameters were discussed. This research demon-
strates the potential possibility of evaluating the
defect depth of ferromagnetic steels using piezom-
agnetic fields.
KEYWORDS: piezomagnetic field defect depth
magnetic parameters pipeline steel tangential
component
https://doi.org/10.1080/09349847.2023.2283512
RNDE Abstracts presents papers
recently accepted to ASNT’s journal
Research in Nondestructive
Evaluation. To subscribe to RNDE
visit asnt.org/rnde.
22
M A T E R I A L S E V A L U A T I O N • J A N U A R Y 2 0 2 4
2401 ME January.indd 22 12/20/23 8:01 AM


