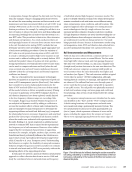
coil under the sensor is covered by a thin strip of iron-cobalt
(FeCo) alloy, a magnetostrictive material, and coupled onto the
wheel using the pressure from the weight of the wheel. Then,
the coil generates SH waves on the strip. The pressure required
for proper coupling is 2 bar (30 psi), but, because the FeCo
strip protects the EMAT coil very effectively, the additional
pressure will not damage the sensor. With the strip coupled,
the SH-guided wave travels through the tread and permits
inspecting approximately 6 mm deep into the tread.
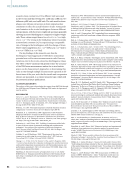
In-Motion Test Setup
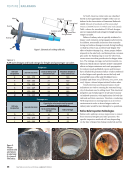
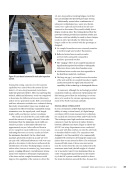
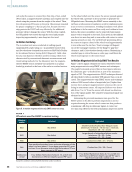
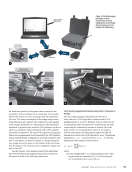
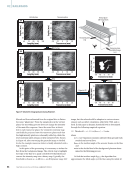
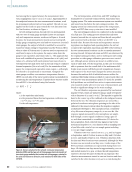
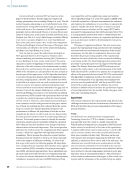
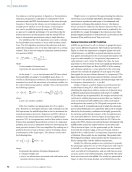
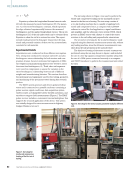
The in-motion tests were conducted at walking speeds
(approximately 5 kph) using a 3.7 m panelized track section
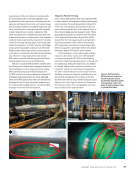
and five wheelsets obtained from service at MxV Rail’s Facility
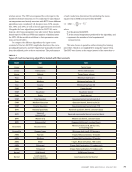
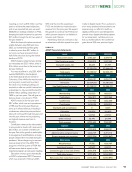
for Accelerated Service Testing (FAST) (Figure 8). Table 1 lists
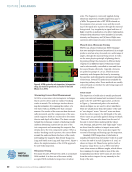
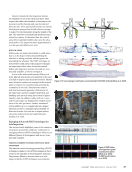
the 965 mm diameter wheelsets used for testing, which were
characterized by conventional ultrasonic measurements and
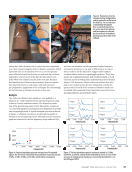
visual testing methods. For the laboratory test, the magneto-
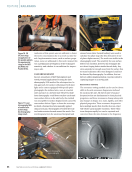
strictive EMAT sensor assembly was mounted on a spring-
loaded jig attached to the base of the rail at a notched section.
As the wheel rolled over the sensor, the sensor pressed against
the wheel with a pressure of about 200 kPa to generate the
SH-guided wave. Mounting the EMAT sensor assembly to the
rail base avoids extensive foundation work for implementation
in an in-service environment. Avoiding foundation work allows
installation to be far easier and less costly, and, without a foun-
dation, the sensor assemblies can be removed if any mainte-
nance work is required on the track. Each notch in the railhead
was about 120 mm long and 30 mm wide with center-to-center
spacing around 500 mm. The rail field side positioning allows
the sensor to inspect a band of the wheel tread approximately
51 mm wide near the rim face. Tread coverage will depend
on (a) the track gage variation, (b) the flange-to-gage face
clearance, and (c) the wheelset lateral position. Maintaining a
standard gage is critical because a wider gage could limit the
wheel tread exposure to the sensor head.
In-Motion Magnetostrictive Strip EMAT Test Results
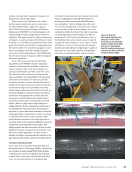
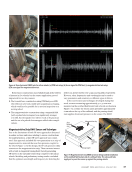
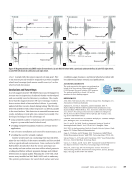
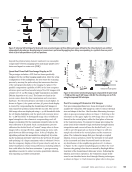
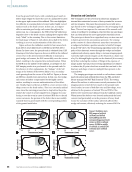
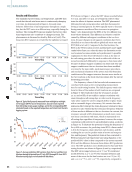
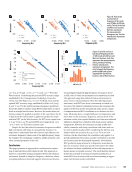
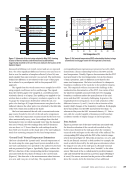
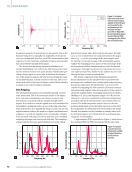
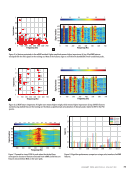
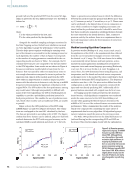
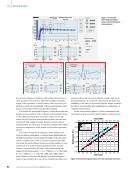
Figure 9 shows signals obtained for various wheelsets tested
using magnetostrictive strip EMAT sensors and techniques.
The purple horizontal arrowed line in these figures indicates
the ultrasonic gate—a threshold set at 40% of the maximum
signal or FSH. The magnetostrictive EMAT technique detected
all wheel defects with an excellent SNR (greater than 4:1 in all
cases). The magnetostrictive-strip EMAT sensor and technique
achieved SNR several orders of magnitude (40:1) higher than
Lorentz force and pure magnetostrictive sensors at the cost of
losing its noncontact nature. All inspected defects were detect-
able from 5° to 175° from the sensor with almost no deteriora-
tion of the signal quality. The saturated wraparound signal was
obtained at 180°.
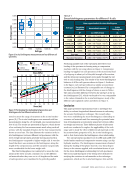
Estimating the potential maximum train speed for the
EMAT system to be able to perform inspections in service
requires knowing the sensor-wheel contact arc that produces
a maximum 3 dB drop in ultrasonic signal. A contact arc
50.8 mm long offered a theoretical maximum inspection speed
ME
|
RAILROADS
Magnetostrictive
EMAT sensor
assembly
Mounting base
and spring
EMAT flaw
detector
Notched rail
Panelized track
Wheelset
Figure 8. In-motion magnetostrictive strip EMAT sensor test setup.
T A B L E 1
Wheelsets used for EMAT in-motion testing
Wheelset
number Left wheel Right wheel
863 No defect
Smaller bands of subsurface fatigue cracks
(minimum: 10 mm (l) × 10 mm (w) × 3 mm (d)
maximum: 38 × 13 × 6 mm)
865 No defect
Larger bands of subsurface fatigue cracks
(minimum: 18 × 20 × 3 mm
maximum: 63 × 20 × 4 mm)
935 No defect Cracked rim (152 × 61 × 17 mm)
965
Two machined notches (inner and outer diameter of the
wheel rim face) about 1.5 mm deep spaced at 90° apart
and two 3 mm diameter side-drilled holes about 25 mm
deep, spaced at 90° apart
Cracked rim (76 × 38 × 9 mm)
Calibration
wheel
Four drilled, flat-bottom holes (6, 13, and 25 mm
diameters) at different depths spaced 90° apart
Four drilled flat-bottom holes (6, 13, and 25 mm
diameters) at different depths spaced 90° apart
the 25 mm hole had a visible crack
Except for conditions noted, all wheels had clean surface conditions
48
M A T E R I A L S E V A L U A T I O N • J A N U A R Y 2 0 2 4
2401 ME January.indd 48 12/20/23 8:01 AM


