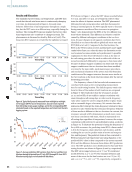
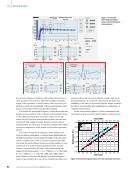
from the ground truth by 3%, with a similarly good match in
defect shape. Figure 8c shows the case of a natural TD located
in the upper right corner of the railhead. This case highlights
the difficulty in scanning defects located under highly curved
surfaces such as the head corners. In this case, it is impos-
sible to maintain good wedge-rail contact throughout the
entire scan. As a consequence, the SNR of the SAF reflections
degrades close to the head corners, making these regions effec-
tively “blind” to the scanning. Due to the contact limitation,
the final image of Figure 8c only shows about half of the defect,
resulting in a severe underestimation of the defect size.
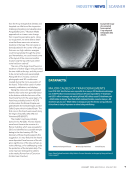
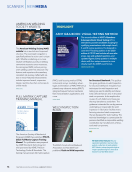
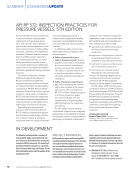
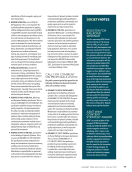
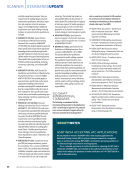
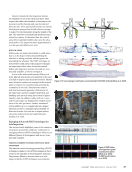
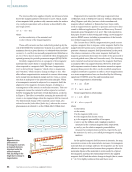
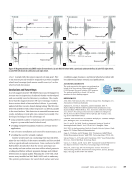
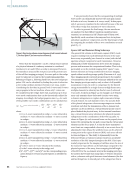
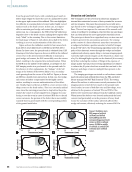
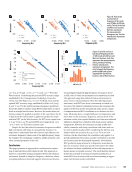
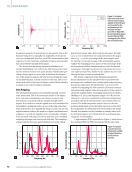
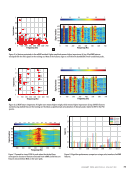
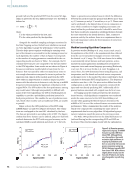
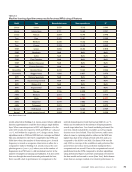
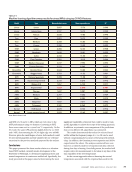
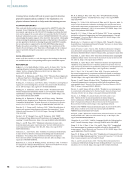
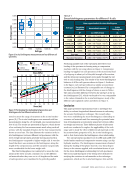
Figure 9 shows the validation results for four cases of arti-
ficial defects (end-drilled holes or EDHs) in the FRA defect
library. In these cases, the ground truth is obtained from CAD
drawings of the holes. Figure 9a shows an EDH in the railhead
corner. Due to the aforementioned difficulty to maintain a
good wedge-rail contact, the ROI cannot fully cover the corner
defect, resulting in the expected size underestimation. When
the EDH is in the middle of the railhead, as in Figure 9b, the
SAF imaging results in a good match to the ground truth. In
the absence of other explanations, the “leakage” of the SAF
image at the bottom of the EDH is likely to be a secondary
crack growing from the corner of the drill bit. Figure 9c shows
an EDH in a heavily worn rail section. In this case, the wedge-
rail contact is further compromised by the highly curved
surface, resulting in a severe underestimation of the defect
size. Finally, Figure 9d shows an EDH in a worn section with a
sharp corner on the head surface. This is an extremely unideal
case, since the scanning process has to stop before the probe
reaches the corner to avoid complete loss of signal. It is com-
forting to see that even in cases of reduced ROI due to the rail
corner curvature, the portion of the defect that is successfully
scanned shows a good match with the corresponding portion
of the ground truth holes.
Discussion and Conclusion
SAF techniques are the new front in ultrasonic imaging of
internal discontinuities because of their potential for accurate
and fast imaging. This paper has presented a portable proto-
type based on SAF techniques applied to the 3D imaging of rail
flaws. This tool can improve the outcome of the manual verifi-
cation of rail flaws by resulting in objective flaw size and shape
that can then inform the most appropriate remedial actions.
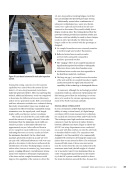
The prototype is hosted in a ruggedized carry-on size case and
is battery powered for autonomous operation. The sensing
probe consists of a linear ultrasonic array that is mounted on
a wedge and includes a position encoder to build 3D images
from 2D SAF slices. The beamforming algorithm tracks the ray
paths of the ultrasonic waves through the wedge and utilizes
sophisticated subarray sparse firing to increase imaging speed.
Currently, high-contrast images can be obtained at a frame rate
of 25 Hz, although higher speeds can be obtained (if necessary)
by further reducing the number of firings at the expense of
image quality. Special post-processing algorithms are utilized
to reduce the 3D point cloud into a result that can lead to the
final size and shape of one (or multiple) flaws present in the
scanned ROI.
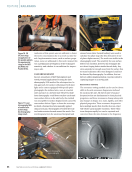
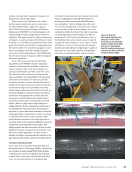
The imaging prototype was tested on rail sections contain-
ing both natural and artificial flaws from the FRA rail defect
library managed by MxV Rail (formerly TTCI). The testing
allowed the authors to refine some control parameters of the
imaging system to find the best match to the ground truth.
Good results, in terms of both flaw size and flaw shape, were
obtained in the presence of natural TDs and EDHs if the
defects were located some distance from the railhead corners.
When instead the defects were located underneath the head
corners (and particularly so in the presence of heavy head
wear), the curvature of the surface adversely affected the
wedge-rail contact, effectively reducing the scanned ROI. In
ME
|
RAILROADS
0
10
20
–40 –20 0 20 40
30
40
50
Transverse x (mm)
0
10
20
–40 –20 0 20 40
30
40
50
Transverse x (mm)
SAF image
Ground truth
ROI
0
10
20
–40 –20 0 20 40
30
40
50
Transverse x (mm)
0
10
20
–40 –20 0 20 40
30
40
50
Transverse x (mm)
Figure 9. Validation tests.
SAF images of artificial
rail flaws (end-drilled
holes [EDHs]) and their
corresponding ground truth
circles: (a) EDH in railhead
corner (b) EDH in middle
of railhead (c) and (d) EDH
in heavily worn railhead
corner.
58
M A T E R I A L S E V A L U A T I O N • J A N U A R Y 2 0 2 4
2401 ME January.indd 58 12/20/23 8:01 AM
Depth
z
(mm)
Depth
z
(mm)
Depth
z
(mm)
Depth
z
(mm)


