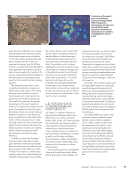
Alternating Current Field Measurement
ACFM is a noncontact electromagnetic technique
that is used to detect and size surface-breaking
cracks in metals. The technique involves detect-
ing discontinuities by scanning the surface of a
test object with an ACFM probe that contains
sensors. The results of the scan are then electroni-
cally monitored, and the components of the asso-
ciated magnetic fields are measured to determine
the size and depth of the flaws. The basic concept
behind this technique consists of inducing locally
uniform alternating current into an area of the
test component and measuring the magnetic flux
density above the test component surface. When a
surface-breaking crack is present, the current flows
around the ends and down the faces of the crack,
interrupting the magnetic flux density (Lugg 2011
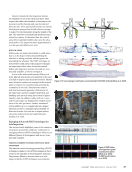
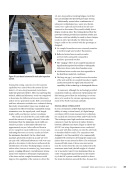
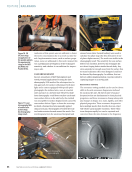
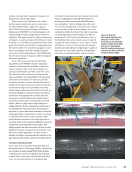
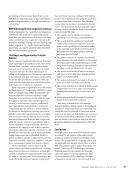
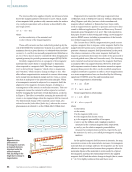
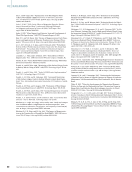
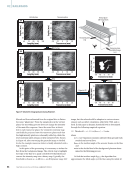
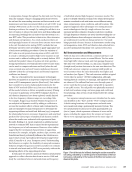
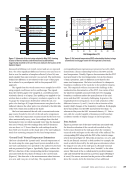
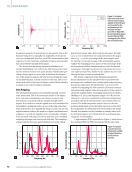
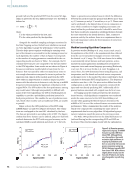
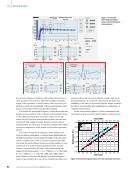
Lugg and Smith 2018 Lugg and Topp 2006). Figure 4
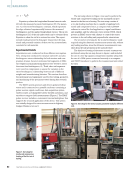
shows the implementation of the ACFM approach
for axle body inspection.
Ultrasonic Testing
For many decades, UT has been used as a standard
NDE method. It is also one of the most widely
accepted NDE methods for inspection of railcar
axles. The frequency commonly applied during
ultrasonic inspection of axles ranges from 2.25 to
5 MHz. The general idea of UT NDE is based on
the emission of an acoustic wave and the record-
ing of the signal after it passes through the material
being tested. Any irregularity in signal and time of
flight could be an indication of a defect. Information
obtained from ultrasonic waves includes (a) acoustic
intensity and frequency and (b) time of flight mea-
surements (determines location of discontinuities).
Phased Array Ultrasonic Testing
PAUT is an advanced ultrasonic NDE technique
that uses multiple elements (transducers) in a single
probe to send an array of sounds, in a wide range of
angles, through the material being tested. It works
on the wave physics principle of phasing that is,
by pulsing (firing) the elements in different delay
sequences (at different times). Ultrasonic beams
can be electronically controlled to steer and focus
the sound beams effectively. Typically, elements
are pulsed in groups of 4 to 32, which increases
sensitivity and sharpens the focus by increasing
the aperture and reducing the unwanted spreading
of the beam. Several UT methods are available for
inspecting railway axles. These methods are usually
selected based on whether the axle being inspected
is solid or hollow.
SOLID AXLES
The inspection of solid axles is usually performed
using conventional manual and automated contact
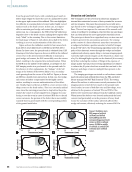
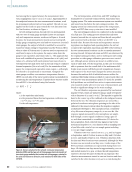
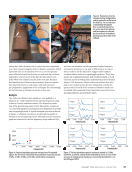
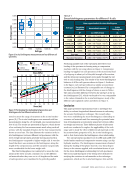
pulse-echo UT and PAUT approaches, as shown
in Figure 5. Conventional pulse-echo methods,
shown in Figure 5a, are used to detect axial flaws.
They are usually done from the surface of the axle
at “zero-degree” scans. “Far-end” scans are done
from the ends to inspect the full length of the axle.
These scans are generally applied during overhauls.
“Near-end” scans are also done from the end of
the axle to detect flaws underneath the wheel-
sets, bearings, and grooves. And “high-angle” scans
are done from the surface to inspect areas under
bearings and wheels. These scans also require the
removal of bearings and bearing caps for inspection.
Similarly, PAUT inspection of solid axles is
usually performed from the surface body of an axle
or from the end of an axle (Liaptsis et al. 2011), as
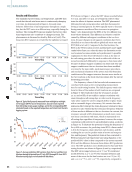
shown in Figure 5b. Phased array probes (with a
frequency range from 2.25 to 5 MHz) emit ultra-
sonic shear waves at different angles, which allows
the scanning of a larger surface area of the axle.
Longitudinal and shear wave scans are also done
from the ends to inspect for any anomaly in the
body of the axle.
FEATURE
|
RAILROADS
Figure 4. ACFM system for axle inspection: (a) inspection
setup (b) results for good axle (c) results for bad axle
(Maass et al. 2014).
WATCH
THE VIDEO
30
M A T E R I A L S E V A L U A T I O N • J A N U A R Y 2 0 2 4
2401 ME January.indd 30 12/20/23 8:01 AM


