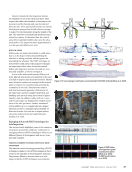
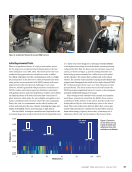
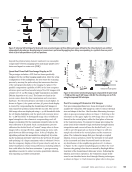
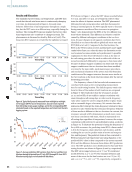
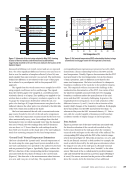
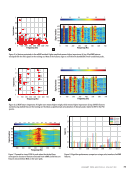
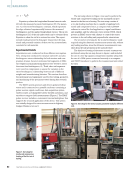
drilled at different depths underneath the wheel tread (running
surface). In the C-scan image, the top corresponds with the
inside of the wheel, and the bottom of the scan corresponds
to reflections from the cold-worked area (near the wheel tread
surface).
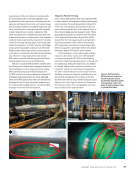
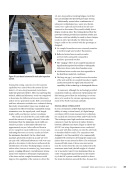
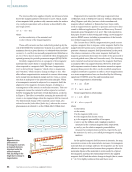
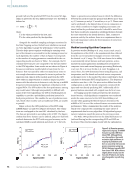
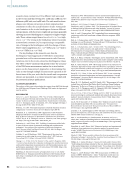
Researchers also observed that a thin layer of cold-worked
material resulted in considerable scatter and attenuation of the
energy of the surface wave, significantly reducing its range and
rendering the technique ineffectual for a significant percentage
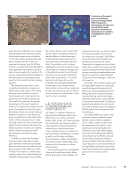
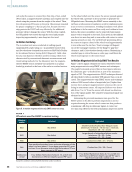
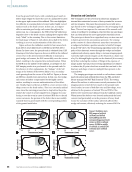
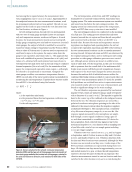
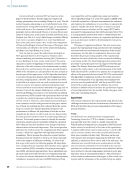
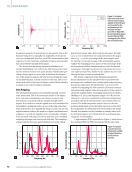
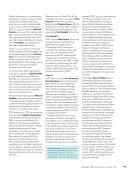
of rolling stock. Figure 5 shows a near-surface deformed layer
that resulted from the high stresses associated with wheel/rail
contact. Unfortunately, this cold-worked area is widespread in
in-service railcar wheels, but since the cold-worked area is not
considered defective, the EMAT normal beam sensors had to
be discarded for the inspection of railroad wheels.
Shear Horizontal Wave EMAT Tests
After the unsuccessful attempt to replicate the normal beam
technique with EMAT sensors (as described in the Initial
Experimental Trials section), another attempt was made using
EMAT-generated guided waves. The first test involved repeating
the surface wave (Rayleigh wave) tests, which confirmed the
wave could propagate around the wheel, but the EMAT sensor
only detected defects within the first 2 mm of the surface and
was heavily affected by surface conditions that impeded the
proper inspection of some wheelsets. A subsequent test using
Lamb waves also showed that coverage was very dependent on
wheel surface conditions and could be ineffective in in-service
railcar wheels.
The next set of trials specifically involved the generation of
SH wave modes using EMATs in railcar wheels. The SH waves
were a better option for the inspection of railcar wheels for the
following reasons. First, the particle motion is horizontal to the
entry plane and therefore parallel to the wheel’s surface. The
lack of a vertical out-of-plane component makes the SH wave
less sensitive to surface conditions, including material changes
in the cold-worked surface area. Second, SH waves pene-
trate deeper and allow for practical inspection depths as deep
as 15–20 mm inside the wheel tread. Despite being a better
option, however, SH waves are difficult to generate efficiently
for two main reasons. First, SH waves cannot be generated
through the standard refraction mechanism used by piezoelec-
tric transducers to generate shear energy. Second, even with
EMATs, the efficiency of SH waves varies greatly depending on
the substrate where they are generated. Conventional EMAT
constructions for generating SH waves involve Lorentz forces
using PPM or magnetostriction (Ribichini et al. 2011).
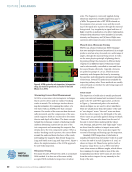
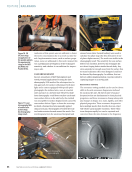
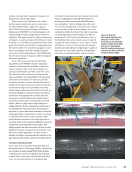
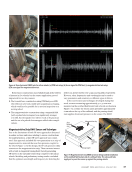
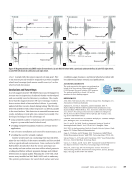
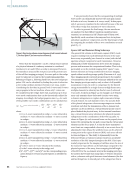
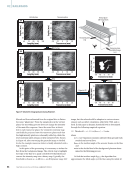
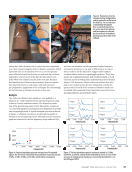
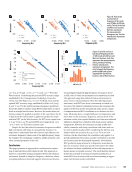
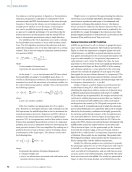
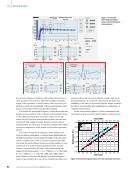
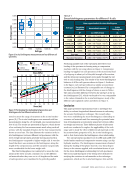
Figure 6 shows the test setups and results obtained using
both SH wave approaches in a test wheel with an outer diameter
(OD) notch. The generation of SH waves on the wheel using
Lorentz forces required PPM, with the size of the magnets
setting the wavelength. Separate transmitter and receiver sensors
were necessary for this technique, making the sensor footprint
large, as shown in Figure 6a. Due to the size limitations that can
be placed on the magnets in the wheel tread, the test was per-
formed at 500 kHz. The test was valid to determine the signal-
to-noise ratio (SNR) and the overall adequacy of the technique
for the application. The A-scan shown in Figure 6b was obtained
at a 57 dB gain with 64 scans averaged to obtain an 80% full
screen height (FSH) signal for an OD notch 203 mm away from
the sensor with a wraparound signal. In EMATs, the wraparound
signal refers to the portion of the ultrasonic wave that propagates
beyond the transducer’s immediate vicinity and returns to the
transducer after interacting with the material under inspection.
The baseline noise for PPM EMAT was around 20%, and the
wraparound signal was 80% at 180°. Similarly, generating SH
waves with magnetostriction directly onto the part requires a
tangential magnetic field that can only be accomplished with
large permanent magnets or a pulsed electromagnet. Since
fitting permanent magnets was not possible, a pulsed electro-
magnet was used to generate SH waves at 610 kHz for these
tests, as shown in Figure 6c.
The A-scan shown in Figure 6d was obtained at a 27 dB
gain to obtain an 80% FSH signal for an OD notch 8 in.
(20.3 cm) away with a wraparound signal. The baseline noise
was around 30% FSH, and the wraparound signal was satu-
rated at 180°. The strong signal observed after the defect signal
was caused by the pulsed electromagnet switching since it
cannot stay on for the whole test duration. The system would
only cover from 5° to 20° circumference, meaning more sensors
would be required for full circumferential coverage. Also, the
SNR was poor for a relatively large defect.
ME
|
RAILROADS
Flange
Tread
Rim
Plate
Undeformed layer
Deformed layer
Wheel tread
1552 μm
750 μm
Figure 5. Railcar wheel
section and microscopy
results: (a) wheel
tread close-up view
(b) deformed layer close
to the wheel tread due to
cold working.
46
M A T E R I A L S E V A L U A T I O N • J A N U A R Y 2 0 2 4
2401 ME January.indd 46 12/20/23 8:01 AM


