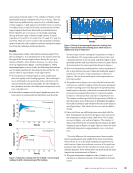
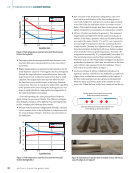
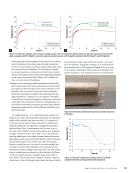
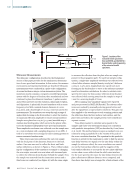
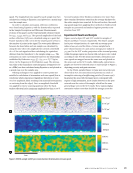
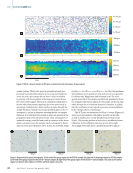
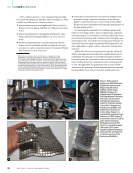
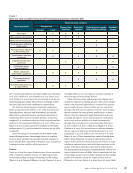
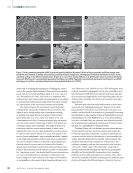
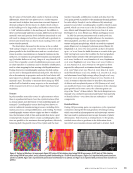
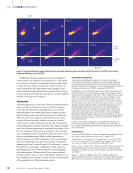
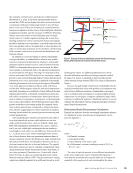
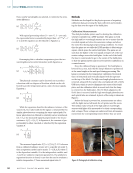
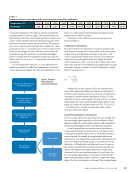
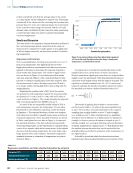
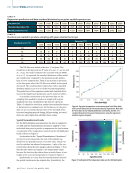
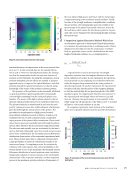
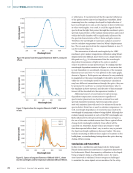
to the inner parts of the cylinder. As the top part cools down, heat is transferred to the lower layers through conduction. The lower layers remain at elevated temperatures longer and are restrained by the build plate. The bottom part, unable to expand, experiences compression while the top is under tension. The residual stresses from this temperature gradient reach a point that breaks off the edges of the cylinders as they curl away from the build plate. Figure 9 shows that the gradual separation from the build plate causes a slow drop in the temperature as measured by the respective thermocouple sensor. Heat continues to flow laterally to the sensor from other parts of the build plate. When the separation is complete, the temperature drop is approximately 5 °C, lasting 2 to 3 h in duration. The extent and duration of the drop is perhaps a reflection on the extent and length of the separation. However, this hypothesis was not tested in this study because the geometry and resultant thermal measurements for all the cylinders in Build 2 were relatively similar. To confirm that the ~5 °C temperature drop observed in Figure 9 is a result of the build plate separation, the deformed profile of the cylinder edge that was above TC1 is analyzed. As the part is built layer by layer vertically, the undistorted cylinder should have an edge that is straight and normal to the build plate. Prior to deformation, the “bottom” part of the edge of the cylinder is built in this manner (see markings in Figure 10). Between the “start” and “end” of the deforma- tion, the middle part of the edge becomes slanted or curved, depending on the nature of the deformation. The bottom part, already built, begins to lift off and curl under the accumu- lation of residual stresses. As a result, it remains straight but no longer normal to the build plate. Once residual stresses are relieved and the curling action stops, the “top” part of the edge is straight again and normal to the build plate. In Figure 10, lines are drawn along an enlarged image of the edge of the cylinder. The fraction of the length for each line segment with respect to the total length can estimate the time at which the deformation began and ended with respect to the total 28.36 h build time. Using this technique, it is estimated that the separation above TC1 began and ended at the 10.04 and 12.72 h marks, respectively. These marks are identified with squares in Figure 11. The beginning and end of deformation Figure 9. Temperature readings, with a 12-point moving average, from TC1 and TC3 for Build 2, where the specimen separated from the build plate, compared with TC1 of Build 1, where the specimen did not separate: (a) TC1 (Build 1 and Build 2) (b) TC1 (Build 1) and TC3 (Build 2). 70 60 50 40 30 20 0 5 10 15 Temperature drop d p n 20 25 30 80 Time (h) 2 (Build ) 2 70 60 50 40 30 20 0 5 10 15 Temperature dropp 20 25 30 80 Time (h) 2 (Build ) 2 due to separation TC1 (Build 1) averag e TC1 averag e due to separationp TC1 (Build 1) averag e TC3 averag e Bottom Top Start End Figure 10. Deformation profile and separation of cylinder edge from build plate. 60 61 62 63 64 65 66 67 68 69 16 14 12 10 8 Time (h) Figure 11. Closeup of temperature readings from TC1 for Build 2 around the time the part separated from the build plate. A P R I L 2 0 2 2 • M A T E R I A L S E V A L U A T I O N 35 T (°) T (°) T (°)
are also identified from the observed changes in the thermal readings from TC1 (that is, drop in temperature) and reaching a new plateau, respectively. Using this method, the start and end of deformation is estimated at the 10.53 and 14.97 h marks, respectively. Those are indicated with circles in Figure 11. As a crude and inherently inaccurate method, the results are in relatively good agreement. Using the ratio of the line length to estimate the fraction of the build is susceptible to error because the cross sections of the horizontal bars vary with time. This explains in part why the square markings in Figure 11 are not in exact agreement with the circles. Conclusions The nominal thermal signature of the AM process as measured from the build plate is expected to vary with the geometry of the part being built. However, the quick rise in temperature early during the process and the gradual drop thereafter, due to the increased height of the part, are expected to be the normal pattern for all part designs. Such patterns can be established experimentally or through thermal analyses. As the part being built begins to separate from the build plate, an abnormal drop in the thermal signature can be recognized. This enables the use of thermocouple sensors to be used for real-time monitor- ing and detection of separation from the build plate, and the resultant deformation of the part. The deformation is otherwise hidden under the powder and would not be realized until the conclusion of the production process. In this case, the operator or the system itself can abort the process at the 10th or 11th hour mark, rather than proceed through the entire 28 or 30 h production schedule. ACKNOWLEDGMENT This work was partially supported by The Aerospace Corp.’s Sustained Experimentation and Research for Program Applications (SERPA) program. REFERENCES Abdul Aziz, M.S., T. Furumoto, K. Kuriyama, S. Tahago, S. Abe, A. Hosokawa, and T. Ueda, , “Residual Stress and Deformation of Consol- idated Structure Obtained by Layered Manufacturing Process,” Journal of Advanced Mechanical Design, Systems, and Manufacturing, Vol. , No. , pp. –, https://doi.org/./jamdsm.. Bean, G.E., D.B Witkin, T.D. McLouth, D.N. Patel, and R.J. Zaldivar, , “Effect of Laser Focus Shift on Surface Quality and Density of Inconel Parts Produced via Selective Laser Melting,” Additive Manufacturing, Vol. , pp. –, https://doi.org/./j.addma... Beshears, R., , “Computed Tomography Inspection and Analysis for Additive Manufacturing Components,” ASNT Annual Conference, November, Nashville, TN Bilheux, H.Z., G. Song, K. An, J.-C. Bilheux, M.M. Kirka, R.R. Dehoff, L.J. Santodonato, S.B. Gorti, B. Radhakrishnan, and Q. Xie, , “Advances in Neutron Radiography: Application to Additive Manufacturing Inconel ,” Advanced Materials and Processes, www.osti.gov/servlets/purl/ Brooks, A.J., G.L. Knapp, J. Yuan, C.G. Lowery, M. Pan, B.E. Cadigan, S. Guo, D.S. Hussey, and L.G. Butler, , “Neutron Imaging of Laser Melted SS Test Objects with Spatially Resolved Small Angle Neutron Scattering,” Journal of Imaging, Vol. , No. , https://doi.org/./jimaging Cerniglia, D., M. Scafidi, A. Pantano, and J. Rudlin, , “Inspection of Additive-Manufactured Layered Components,” Ultrasonics, Vol. , pp. –, https://doi.org/./j.ultras... Edwards, R.S., B. Dutton, A.R. Clough, and M.H. Rosli, , “Scanning Laser Source and Scanning Laser Detection Techniques for Different Surface Crack Geometries,” AIP Conference Proceedings, Vol. , https:// doi.org/./. Everton, S., P. Dickens, C. Tuckand, and B. Dutton, , “Evaluation of Laser Ultrasonic Testing for Inspection of Metal Additive Manufac- turing,” Proceedings Laser D Manufacturing II, Vol. , https://doi. org/./. Griffith, M.L, M.E. Schlienger, L.D. Harwell, M.S. Oliver, M.D. Baldwin, M.T. Ensz, M. Essien, J. Brooks, C.V. Robino, J.E. Smugeresky, W.H. Hofmeister, M.J. Wert, and D.V. Nelson, , “Understanding Thermal Behavior in the LENS Process,” Materials & Design, Vol. , No. –, pp. –, https://doi.org/./S-()- Helvajian, H., A. Manzo, and S. Kenderian, , “Application of Laser Ultrasonic Nondestructive Evaluation Technique to Additive Manufac- turing,” ASNT Annual Conference, – October, Long Beach, CA Klein, M., and J. Sears, , “Laser Ultrasonic Inspection of Laser Cladded LSS and Ti--,” Proceedings of the rd International Congress on Applications of Lasers and Electro-Optics, Laser Institute of America Kube, C.M., , “Attenuation of Laser Generated Ultrasound in Steel at High Temperatures: Comparison of Theory and Experimental Measure- ments,” Ultrasonics, Vol. , pp. –, https://doi.org/./j. ultras... Manzo, A.J., S. Kenderian, and H. Helvajian, , “Application of Laser Ultrasonic Nondestructive Evaluation Technique to Additive Manufac- turing,” Proceedings of SPIE, Vol. , https://doi.org/./. Martinez-Anton, J.C., I. Serroukh, and E. Bernabeu, , “Laser Diffrac- tion Wire Diameter Measurements: Correction of Diffraction Models by Interferometric Calibration,” Proceedings, Optical Measurement Systems for Industrial Inspection, Vol. , https://doi.org/./. McLouth, T.D., G.E. Bean, D.B. Witkin, S.D. Sitzman P.M. Adams, D.N. Patel, W. Park, J.-M. Yang, and R.J. Zaldivar, , “The Effect of Laser Focus Shift on Microstructural Variation of Inconel Produced by Selec- tive Laser Melting,” Materials & Design, Vol. , pp. –, https://doi. org/./J.MATDES... Rodriguez, E., F. Medina, D. Espalin, C. Terrazas, D. Muse, C. Henry, E. Macdonald, and R.B. Wicker, , “Integration of a Thermal Imaging Feedback Control System in Electron Beam Melting,” Proceedings of rd Annual International Solid Freeform Fabrication Symposium, Austin, TX, pp. – Rodriguez, E., J. Mireles, C.A. Terrazas, D. Espalin, M.A. Perez, and R.B. Wicker, , “Approximation of Absolute Surface Temperature Measure- ments of Powder Bed Fusion Additive Manufacturing Technology Using In Situ Infrared Thermography,” Additive Manufacturing, Vol. , pp. –, https://doi.org/./j.addma... Slotwinski, J.A., and E.J. Garboczi, , “Porosity of Additive Manufac- turing Parts for Process Monitoring,” th Annual Review of Progress in Quantitative Nondestructive Evaluation, AIP Conference Proceedings, Vol. , No. , https://doi.org/./. Smith, R.J., M. Hirsch, R. Patel, W. Li, A.T. Clare, and S.D. Sharples, , “Spatially Resolved Acoustic Spectroscopy for Selective Laser Melting,” Journal of Materials Processing Technology, Vol. , pp. –, https:// doi.org/./j.jmatprotec... Thiede, T., , “An Assessment of Bulk and Surface Residual Stress in Selective Laser Melted Inconel ,” ECNDT Conference, – June, Gothenburg, Sweden Watkins, T., H. Bilheux, K. An, A. Payzant, R. Dehoff, C. Duty, W. Peter, C. Blue, and C. Brice, , “Neutron Characterization for Additive Manufac- turing,” Advanced Materials and Processes, Vol. , No. , pp. – Zhou, X., D. Wang, X. Liu, D. Zhang, S. Qu, J. Ma, G. London, Z. Shen, and W. Liu, , “D-Imaging of Selective Laser Melting Defects in a Co–Cr– Mo Alloy by Synchrotron Radiation Micro-CT,” Acta Materialia, Vol. , pp. –, https://doi.org/./j.actamat... ME | THERMOCOUPLEMONITORING 36 M A T E R I A L S E V A L U A T I O N • A P R I L 2 0 2 2
ASNT grants non-exclusive, non-transferable license of this material to  .
All rights reserved. © ASNT 2025. To report unauthorized use, contact: customersupport@asnt.org


