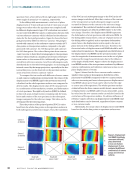
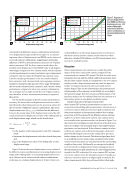
DIC Advantages, Disadvantages, and Other NDE Options Compared with computed tomography (CT), scanning electron microscopy (SEM), and acoustic emission testing (AE), DIC has the advantages of large test range, lower cost, high precision, and full- field observation. Other benefits include: Ñ DIC can detect defects (e.g., cracks) in the loaded condition—especially compared to other conven- tional NDE methods. Ñ DIC can be applied for simple as well as complex geometry. Ñ DIC is an effective noncontact optical method that can be used to compute various material parameters such as Young’s modulus and Poisson’s ratio. Ñ DIC can be used for ambient and elevated temperature testing. Ñ DIC can be used for static, dynamic, and shock testing. It has several advantages over conven- tional methods, such as strain gauges. It is extremely accurate and easy to use. No complex wiring is required in DIC to transfer the strain values to the strain measuring system, unlike strain gauges. Moreover, strain gauges are subject to debonding from the surface of the test specimen once the strain values exceed a certain limit, whereas DIC has no such limitation. Ñ Strain contours acquired can be directly compared with FEA results. Ñ DIC can validate the FEA results, especially when complex materials and structures (such as welds) are involved. Ñ DIC is a noncontact measurement that provides full-field deformation analysis and an unlimited number of deformation measurements. Ñ DIC provides measurement of the real maximum displacements and deformations in all directions (along the X-axis, Y-axis, and Z-axis), on a plane or in 3D space. Ñ DIC setup involves only a quick preparation of a random pattern of black dots on the white back- ground on the sample surface by spraying paint. The limitations of DIC are as follows: Ñ The system is dependent on natural lighting conditions, creating the need to apply artifi- cial light when registering images with high frequency. Ñ It is required to use calibration tables appropriate to the size of the tested sample area. Ñ Large storage media is required to archive recorded images and to obtain research results. Ñ The cost of software and camera can escalate depending on their specifications and capabili- ties. Ñ The inspected component/test sample must be cleaned after testing. Concluding Remarks DIC is an emerging optical measurement technol- ogy due to its unique abilities, such as noncontact measurement, full-field strain and displacement data extracting, and high precision. It is widely used as well. Recent important advances in DIC—with an emphasis on new insights into the 2D and 3D-DIC systems, improvements to the correlation algorithm, and new developments in stereo-DIC systems— have made it an effective standalone NDE system. Its technical approach and evaluation schemes are considered to be among key instrumentations in the field of optical measurements and inspection. It offers a broad range of capabilities, allows assess- ment of hard-to-inspect sites, and manages very complicated tasks. Further, technological advance- ments in the optical and electronics fields have made DIC very practical to evaluate irregularities, collect strain and displacement measurements in advanced materials testing (including composites), and inspect engine components, with applications for medical, automotive, vibration analysis, and so on. As a noncontact NDE tool, DIC is a very promis- ing inspection technique, and the future outlook for such methodology is inspiring. AUTHORS Ali Abdul-Aziz: College of Aeronautics and Engineering, Kent State University, Kent, OH aabdula3@kent.edu CITATION Materials Evaluation 80 (11): 26-31 https://doi.org/10.32548/2022.me-04306 ©2022 American Society for Nondestructive Testing REFERENCES Abdul-Aziz, Ali, and Adam C. Wroblewski. 2016. “Durability Analysis and Experimental Validation of Environmental Barrier Coating (EBC) Performance Using Combined Digital Image Correlation and NDE.” Coatings 6 (4): 70. https://doi. org/10.3390/coatings6040070. Aerospace Testing International. 2021. “Digital image correlation: How and when to use it in aerospace testing.” Aerospace Testing International, 25 March 2021. https://aerospacetestinginternational.com/ features/how-digital-image-correlation-is-maturing-in- to-an-accurate-and-trusted-tool-for-aerospace-engineers. html NDT TUTORIAL | OVERVIEWOFDIC 30 M AT E R I A L S E V A L U AT I O N • N O V E M B E R 2 0 2 2
Celli, D., M. Herman Shen, C. Holycross, O. Scott-Emuakpor, and T. George. 2019. “Measurement of Hysteresis Energy Using Digital Image Correlation with Application to Ener- gy-Based Fatigue Life Prediction.” ASME. J. Eng. Gas Turbines Power. September 2019 141(9): 091018. https://doi. org/10.1115/1.4044202 Chai, Jing, Yongliang Liu, YiBo OuYang, Dingding Zhang, and Wengang Du. 2020. “Application of Digital Image Correla- tion Technique for the Damage Characteristic of Rock-like Specimens under Uniaxial Compression.” Advances in Civil Engineering, Vol. 2020, Article ID 8857495. https://doi. org/10.1155/2020/8857495 Correlated Solutions. n.d. “Digital Image Correlation Appli- cations by Industry.” Accessed 20 September 2022. https:// correlatedsolutions.com/applications/. Dantec Dynamics. n.d. “Solid Mechanics DIC.” Accessed 20 September 2022. https://dantecdynamics.com/ solutions-applications/solutions/stress-strain-espi-dic/ digital-image-correlation-dic/ Malesa, Marcin, Krzysztof Malowany, Urszula Tomczak, Bartłomiej Siwek, Małgorzata Kujawinska, ′ and Anna Sieminska-Lewandowska. ′ 2013. “Application of 3D digital image correlation in maintenance and process control in industry.” Computers in Industry 64 (9): 1301–15. https://doi. org/10.1016/j.compind.2013.03.012. McCormick, Nick, and Jerry Lord. 2010. “Digital Imaging Correlation.” Materials Today, Vol. 13, No. 12, 52–54. https:// doi.org/10.1016/S1369-7021(10)70235-2. Mguil-Touchal, S., F. Morestin, and M. Brunet. 1997. “Various Experimental Applications of Digital Image Correlation Method.” Transactions on Modelling and Simulation, 16: 45–58. Ramos, Tiago, André Furtado, Shayan Eslami, Sofia Alves, Hugo Rodrigues, António Arêde, Paulo J. Tavares, and P. M. G. P. Moreira. 2015. “2D and 3D Digital Image Correlation in Civil Engineering – Measurements in a Masonry Wall.” Procedia Engineering 114:215–22. https://doi.org/10.1016/j. proeng.2015.08.061. Shadmehri, Farjad, and Suong Van Hoa. 2019. “Digital Image Correlation Applications in Composite Automated Manufac- turing, Inspection, and Testing.” Applied Sciences (Basel, Swit- zerland) 9 (13): 2719. https://doi.org/10.3390/app9132719. Tong, W. 2005. “An Evaluation of Digital Image Correlation Criteria for Strain Mapping Applications.” Strain 41 (4): 167–75. https://doi.org/10.1111/j.1475-1305.2005.00227.x. Zappa, E., and N. Hasheminejad. 2017. “Digital Image Correlation Technique in Dynamic Applications on Deform- able Targets.” Experimental Techniques 41 (4): 377–87. https:// doi.org/10.1007/s40799-017-0184-3. N O V E M B E R 2 0 2 2 • M AT E R I A L S E V A L U AT I O N 31
ASNT grants non-exclusive, non-transferable license of this material to  .
All rights reserved. © ASNT 2026. To report unauthorized use, contact: customersupport@asnt.org


