
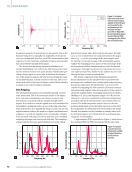
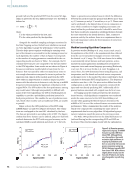
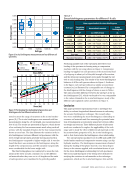
Both sensor constructions successfully found all the defects
of interest in five wheels, but the sensor application proved
impractical for two key reasons:
Ñ The Lorentz force construction using PPM had poor SNR.
The reflectors were only visible after a significant averaging,
which would not be possible for in-motion inspection on a
moving wheel.
Ñ The magnetostrictive construction using a tangential field
(with a pulsed electromagnet) was significantly stronger
(20 dB), but the signals were still too weak to be practical,
and the use of a pulsed electromagnet added other compli-
cations.
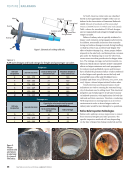
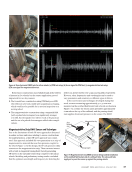
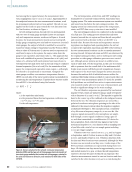
Magnetostrictive Strip EMAT Sensor and Technique
Due to the limitations of both SH wave approaches discussed
in earlier sections and issues relating to sensor constructions
for implementation, a third SH wave approach was consid-
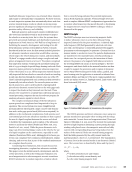
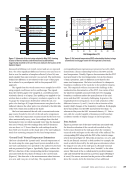
ered. This approach included SH wave generation on a strip of
magnetostrictive material that was then pressure-coupled to
the wheel (Figure 7). In this design, the RF coil generates eddy
currents on the magnetostrictive strip. These currents interact
with a built-in tangential biasing field, thereby generating
SH waves on the specially treated strip coupled to the railcar
wheels. Modeling and preliminary testing results concluded
that the optimum wavelength and frequency for detecting the
defects on all the wheels were 5 mm and 625 kHz, respectively.
However, other frequencies and wavelengths can be used to
vary penetration and sensitivity to different types of defects.
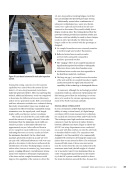
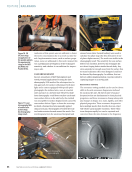
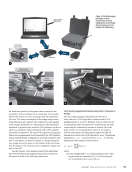
In the novel sensor and technique developed during this
work, a sensor measuring approximately 50 × 50 mm was
mounted on the notched field (outer) side of a rail, as shown in
Figure 7. As a result, the sensor patch protrudes approximately
6 mm above the top of the railhead, and the passing wheel/
train applies downward pressure on the sensor. The EMAT
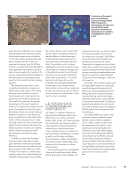
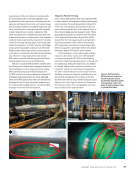
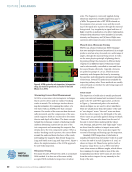
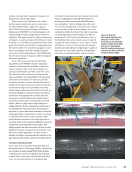
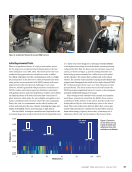
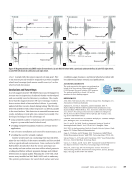
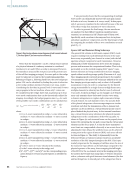
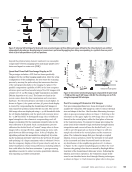
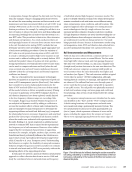
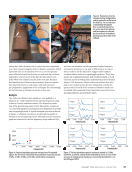
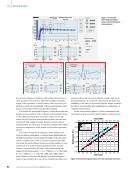
Figure 6. Shear horizontal EMAT tests for railcar wheels: (a) PPM test setup (b) A-scan signal for PPM test (c) magnetostrictive test setup
(d) A-scan signal for magnetostrictive test.
Magnetostrictive strip
Radio
frequency
coil N
S
Shear
horizontal
wave
Biasing magnet
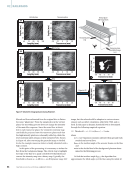
Figure 7. Magnetostrictive strip EMAT (a) sensor design and (b) installation
on the notched field (outer) side of a railhead. Note: The valve and tube
supply air to press the sensor up against the passing wheels.
J A N U A R Y 2 0 2 4 • M A T E R I A L S E V A L U A T I O N 47
2401 ME January.indd 47 12/20/23 8:01 AM
of interest in five wheels, but the sensor application proved
impractical for two key reasons:
Ñ The Lorentz force construction using PPM had poor SNR.
The reflectors were only visible after a significant averaging,
which would not be possible for in-motion inspection on a
moving wheel.
Ñ The magnetostrictive construction using a tangential field
(with a pulsed electromagnet) was significantly stronger
(20 dB), but the signals were still too weak to be practical,
and the use of a pulsed electromagnet added other compli-
cations.
Magnetostrictive Strip EMAT Sensor and Technique
Due to the limitations of both SH wave approaches discussed
in earlier sections and issues relating to sensor constructions
for implementation, a third SH wave approach was consid-
ered. This approach included SH wave generation on a strip of
magnetostrictive material that was then pressure-coupled to
the wheel (Figure 7). In this design, the RF coil generates eddy
currents on the magnetostrictive strip. These currents interact
with a built-in tangential biasing field, thereby generating
SH waves on the specially treated strip coupled to the railcar
wheels. Modeling and preliminary testing results concluded
that the optimum wavelength and frequency for detecting the
defects on all the wheels were 5 mm and 625 kHz, respectively.
However, other frequencies and wavelengths can be used to
vary penetration and sensitivity to different types of defects.
In the novel sensor and technique developed during this
work, a sensor measuring approximately 50 × 50 mm was
mounted on the notched field (outer) side of a rail, as shown in
Figure 7. As a result, the sensor patch protrudes approximately
6 mm above the top of the railhead, and the passing wheel/
train applies downward pressure on the sensor. The EMAT
Figure 6. Shear horizontal EMAT tests for railcar wheels: (a) PPM test setup (b) A-scan signal for PPM test (c) magnetostrictive test setup
(d) A-scan signal for magnetostrictive test.
Magnetostrictive strip
Radio
frequency
coil N
S
Shear
horizontal
wave
Biasing magnet
Figure 7. Magnetostrictive strip EMAT (a) sensor design and (b) installation
on the notched field (outer) side of a railhead. Note: The valve and tube
supply air to press the sensor up against the passing wheels.
J A N U A R Y 2 0 2 4 • M A T E R I A L S E V A L U A T I O N 47
2401 ME January.indd 47 12/20/23 8:01 AM


